

Pattern & Copyright Note: Crochet patterns may vary slightly depending on your yarn, hook size, and personal tension. Use the measurements and instructions as a guide, and adjust your tension as needed. This CrochetFloria tutorial, including its instructions, photos, and original content, is protected by copyright. You’re welcome to make the finished project for personal use or as a gift. Please do not copy, republish, or redistribute the pattern or photos. To share it, please link to the original CrochetFloria article.
Affiliate Disclosure: We earn from qualifying purchases made through the affiliate links in this article, at no extra cost to you. We only recommend products that may be useful for your crochet projects.
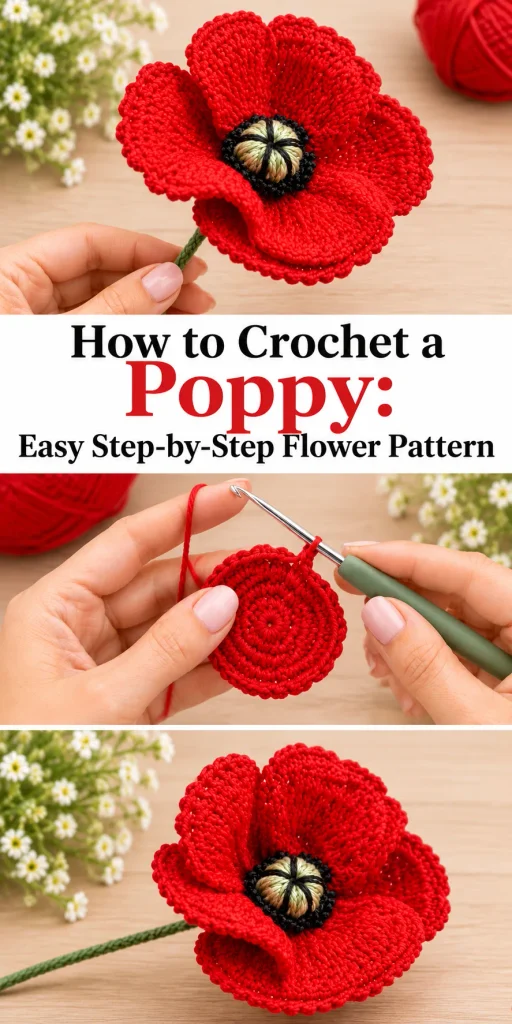
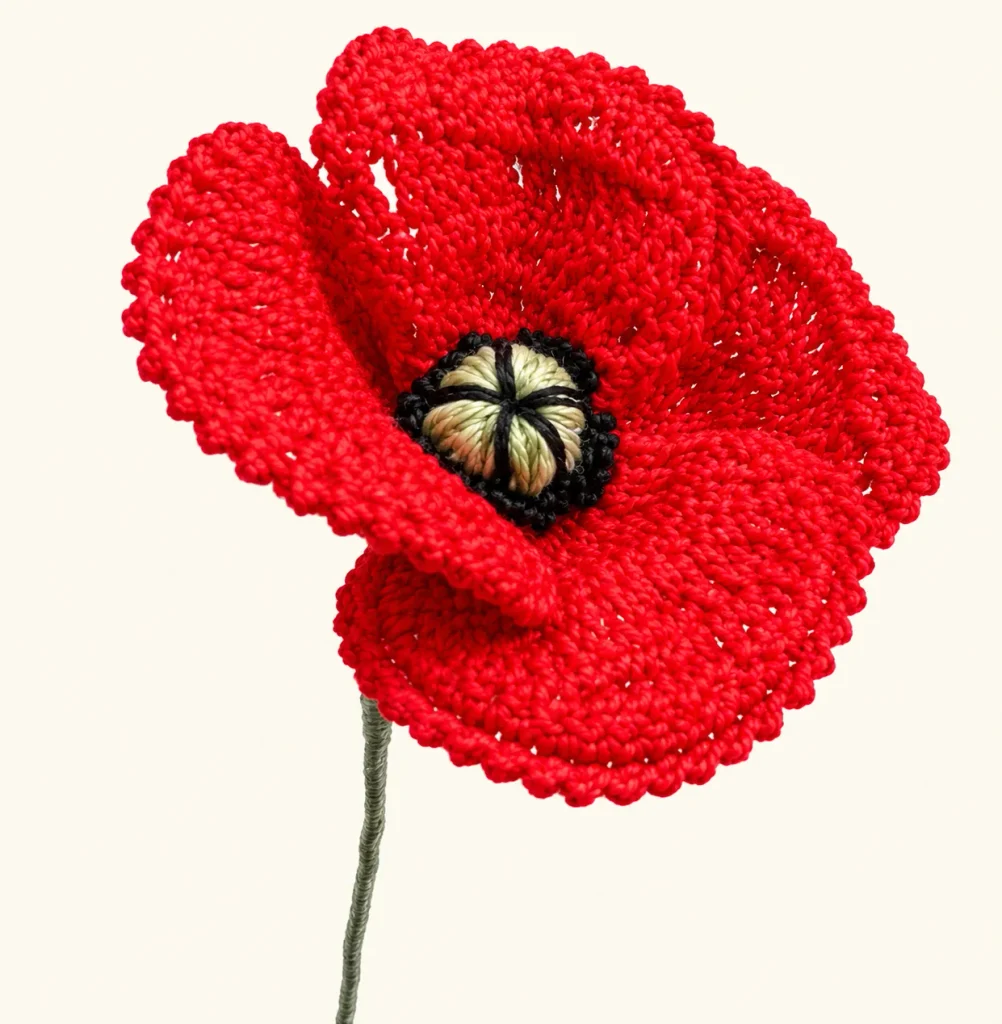
A poppy is one of those flowers you recognize instantly. Four wide, silky red petals open around a dark center, and the whole bloom looks a little crumpled and delicate, as if it could blow away in the wind. That slightly relaxed shape is what makes it so charming in crochet, because the petals do not need to be perfect. A gentle ruffle and a soft curve make it look more natural.
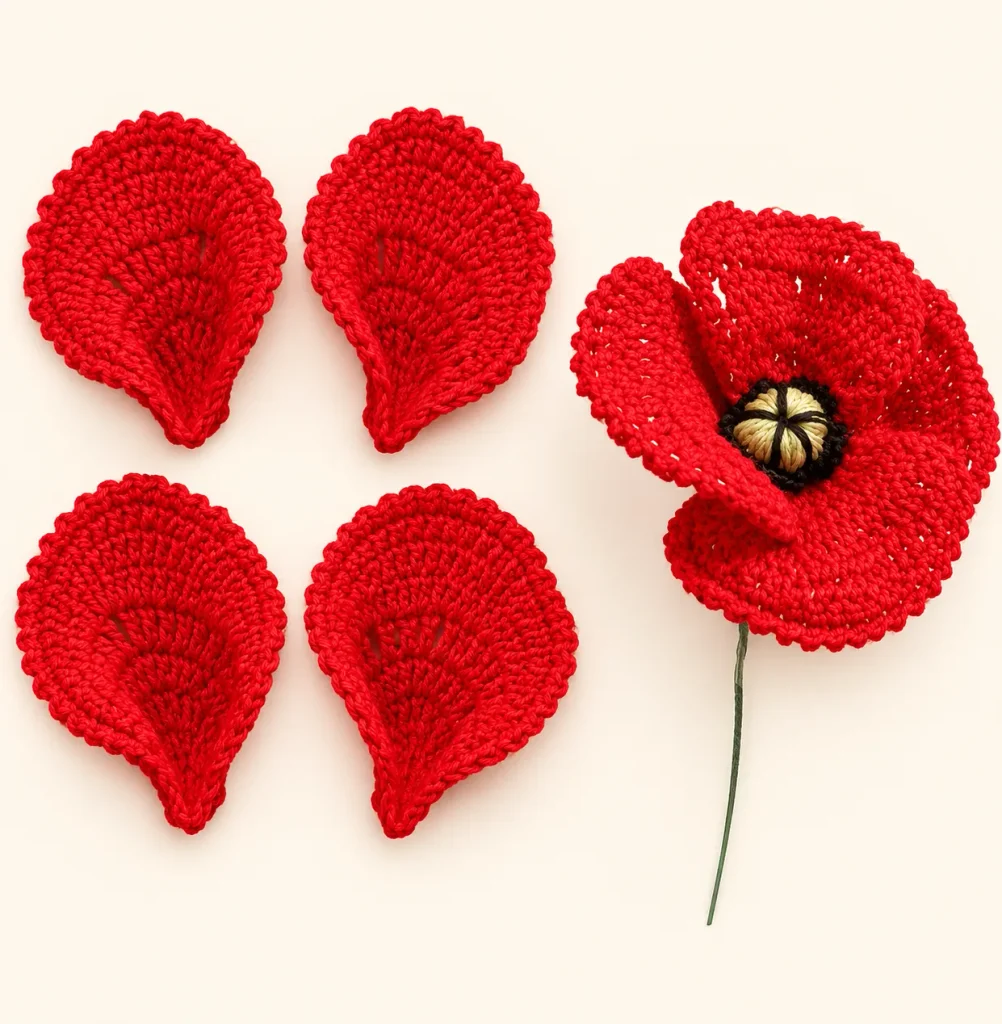
In this tutorial, you’ll learn how to crochet a poppy from two simple parts: four red petals and a small corolla, the dark center of the flower. Each petal is worked from a tiny starting chain and shaped with a wired edge, which lets you bend and curve it into a natural pose. The corolla is a flat crocheted button with a ring of little loops around its rim. The petals attach to the corolla, the wires are twisted together to form the stem, and the stem is wrapped in green floral tape. The finished flower is poseable and sturdy enough to stand in a vase on its own.
You’ll also find a full materials list, an abbreviations guide, step-by-step instructions matched to your photos, tips for neat wire work, fixes for common problems, color ideas, bouquet suggestions, and care advice. If you’re new to reading patterns, our guide to crochet symbols and abbreviations is a useful companion to keep open while you work. And once you’ve made your first poppy, you can combine it with other flowers from CrochetFloria, such as crochet lavender and a crochet tulip, for a garden-style arrangement.
Save This on Pinterest!
Don’t have time to read this tutorial on crochet symbols and abbreviations right now? Save it on Pinterest so you can come back later and use this how to Crochet a Poppy
Why Poppies Are Worth Crocheting
Poppies bring something different to a crochet flower collection.
- They add a bold pop of color. Red is one of the strongest colors you can put in a bouquet, and a few poppies instantly draw the eye.
- They look good without being perfect. Real poppies have soft, slightly uneven petals, so small differences between your petals make the flower look more natural rather than less.
- The pieces are small. Each petal is a quick, compact piece, so the flower comes together in manageable steps.
- The wire gives you control. Because the petal edges are worked around wire, you can ruffle, curl, or open each one to get the look you want.
- They suit many styles. A poppy feels cottage-style, rustic, and a little wild, which is a nice contrast to more formal, sculptural flowers.
Crochet Poppy Pattern Overview
| Detail | Info |
| Project type | Crochet flower with wire stem |
| Yarn | Cotton 8 |
| Colors | Red (petals), black and soft green (center) |
| Hook | Size B (1.90 mm) |
| Wire | 0.6 mm |
| Stem covering | Green floral tape |
| Parts | 4 petals, 1 corolla |
| Terminology | US crochet terms |
Materials and Tools You’ll Need
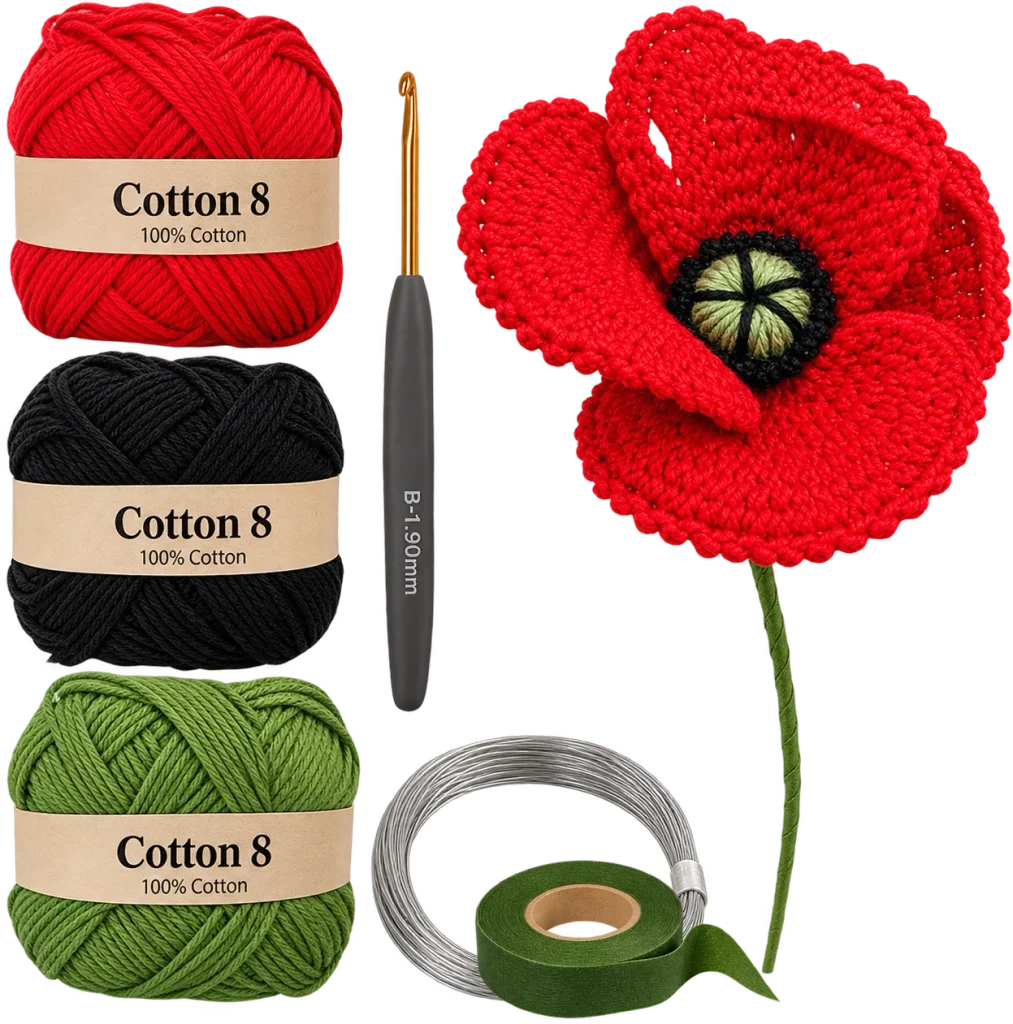
- Cotton 8 in red for the petals.
- Cotton 8 in black for the flower center.
- Cotton 8 in soft green for the flower center.
- Crochet hook, size B (1.90 mm).
- Wire, 0.6 mm, worked into the edge of each petal and used for the stem.
- Green floral tape to cover the stem.
Why these materials work. Cotton has a smooth, slightly crisp finish and holds its shape well around a wired edge. Red cotton also has a rich, even color, which helps the petals look bold rather than faded.
Why use wire in the petals? The wire is what lets you shape each petal. You can bend the edges outward, curl them slightly, or fold them to create the crinkled look of a real poppy.
A note on safety. Wire ends can be sharp. Make sure all ends are covered or tucked away, especially if you plan to give the flowers as gifts or display them around children or pets.
Crochet Supplies Quick Links
Explore useful supplies and tools for your crochet projects. These shopping links make it easier to find materials and accessories for your next handmade creation
- Cotton Yarn – Find cotton yarn in different colors for your flower.
- Cotton 8 Yarn – Browse yarn options for small crochet projects.
- Crochet Hooks – Find the right hook for your crochet work.
- Floral Wire – Useful for shaping petals and making flower stems.
- Green Florist Tape – Wrap and finish your crochet flower stems.
- Shop LoveCrafts – Discover more yarn and craft supplies.
Crochet Stitches and Abbreviations
This pattern uses US crochet terms. The petals are worked from a small starting chain, and the corolla is worked from a small ring. If any stitch is unfamiliar, our beginner-friendly guide to crochet symbols and abbreviations explains each one in detail.
| Abbreviation | Meaning |
| ch | Chain |
| st | Stitch (used here for the joining stitch, or slip stitch) |
| sc | Single crochet |
| dc | Double crochet |
| 2 dc together | Work two double crochets together into one stitch (a decrease) |
| Rnd | Round |
| Crab stitch | Single crochet worked backward, creating a rope-like edge |
Before you start: Read through the whole pattern once, including the wire steps. The wire is added after the petal body is finished, so it helps to know when to prepare it.
How to Crochet a Poppy Step by Step
The poppy is made of two parts: the petals and the corolla. You’ll make four petals, then the corolla, and then join everything with the wire and finish the stem.
Step 1: Crochet the Petal Body (Make 4)
Use red cotton and the 1.90 mm hook. You will make four identical petals.
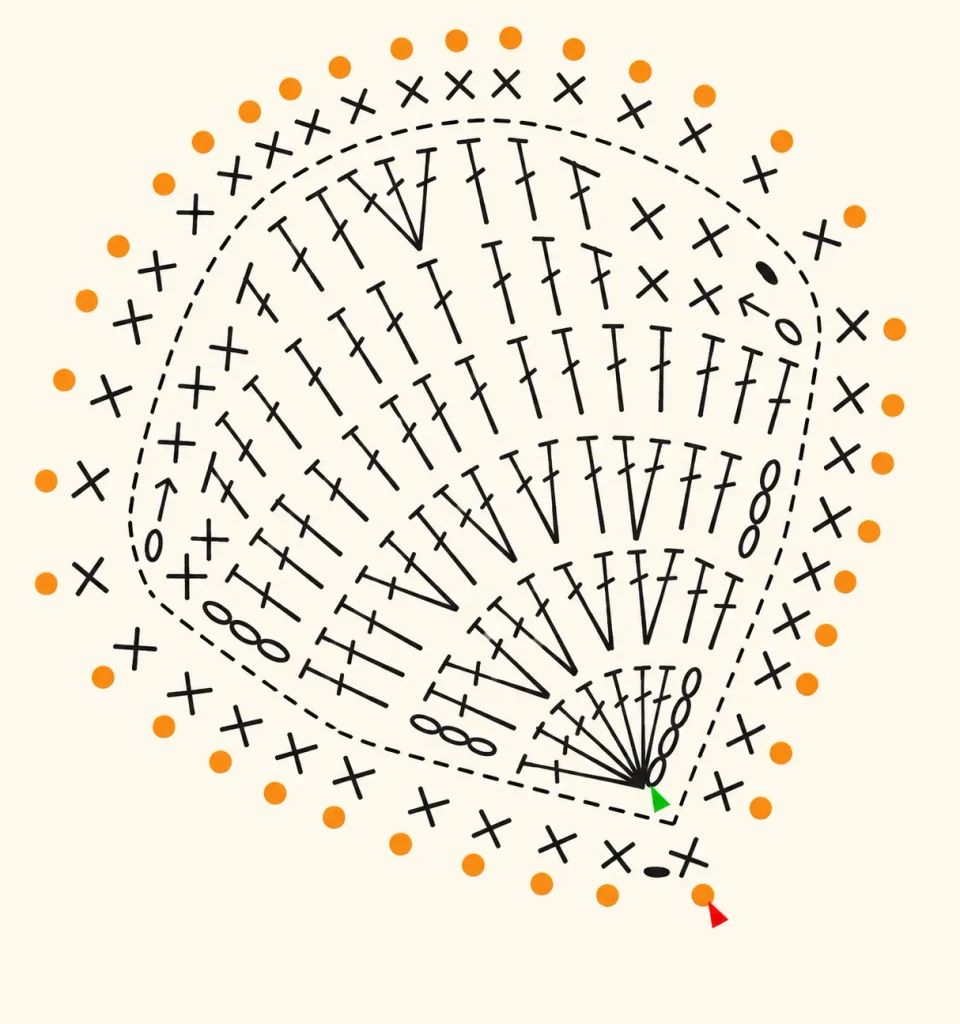
- Rnd 1: Begin with 4 ch. Work 7 dc in the first chain.
- Rnd 2: 3 ch, 1 dc, 2 dc together, 2 dc together, 2 dc together, 2 dc together, 2 dc.
- Rnd 3: 3 ch, 2 dc, 2 dc together, 1 dc, 2 dc together, 2 dc together, 1 dc, 2 dc together, 3 dc.
- Rnd 4: 3 ch, 15 dc.
- Rnd 5: 1 ch, skip 1 stitch, 2 sc, 10 dc, 2 sc.
- Rnd 6: 1 ch, skip 1 stitch, 3 sc, 3 dc, 3 dc together, 3 dc, 3 sc. Break off the yarn.
What you should see: A small, rounded, fan-like petal that widens and then curves in toward the base. The decreases in the middle rounds help shape it into a petal rather than a flat circle.
Step 2: Add the Wire and Finish the Petal Edge
Prepare the 0.6 mm wire for the petal edge.
- Attach the red yarn at the base of the petal.
- Rnd 7: Work all around the petal in sc, incorporating the wire as you go. Join with 1 st.
- Rnd 8: Work all around the petal in crab stitch. Break off the yarn.
- Repeat Steps 1 and 2 until you have 4 petals.
What you should see: A finished petal with a firm, neatly covered edge. The crab stitch gives the outline a slightly rounded, rope-like finish.
Tip: Keep the wire snug inside your stitches so it’s fully covered. The wire is what lets you shape the petal, so you want it hidden and secure along the whole round, with no sharp ends poking out.
You May Also Like
- How to Crochet a Calla Lily: Easy Step-by-Step Tutorial
- Crochet Holly Leaves and Berries: 8 Easy Patterns
- Crochet Daisy Flower Applique: Ideas and Uses
- Crochet Flower Hair Accessories
Step 3: Crochet the Corolla (Flower Center)
The corolla is a small crochet button with a ring of loops around its rim. If you’d like to see the button technique worked out, there’s a video tutorial available for this part.
- Chain 3 and join with 1 st to form a ring.
- Work 40 sc inside the ring. Break off the yarn.
- Work 5 sc inside the ring.
- Work 5 times: 1 sc, 5 ch on the outer rim of the button.
- Break off the yarn.
What you should see: A small, flat, round button with five little chain loops standing out around the edge. These loops give the poppy its textured center.
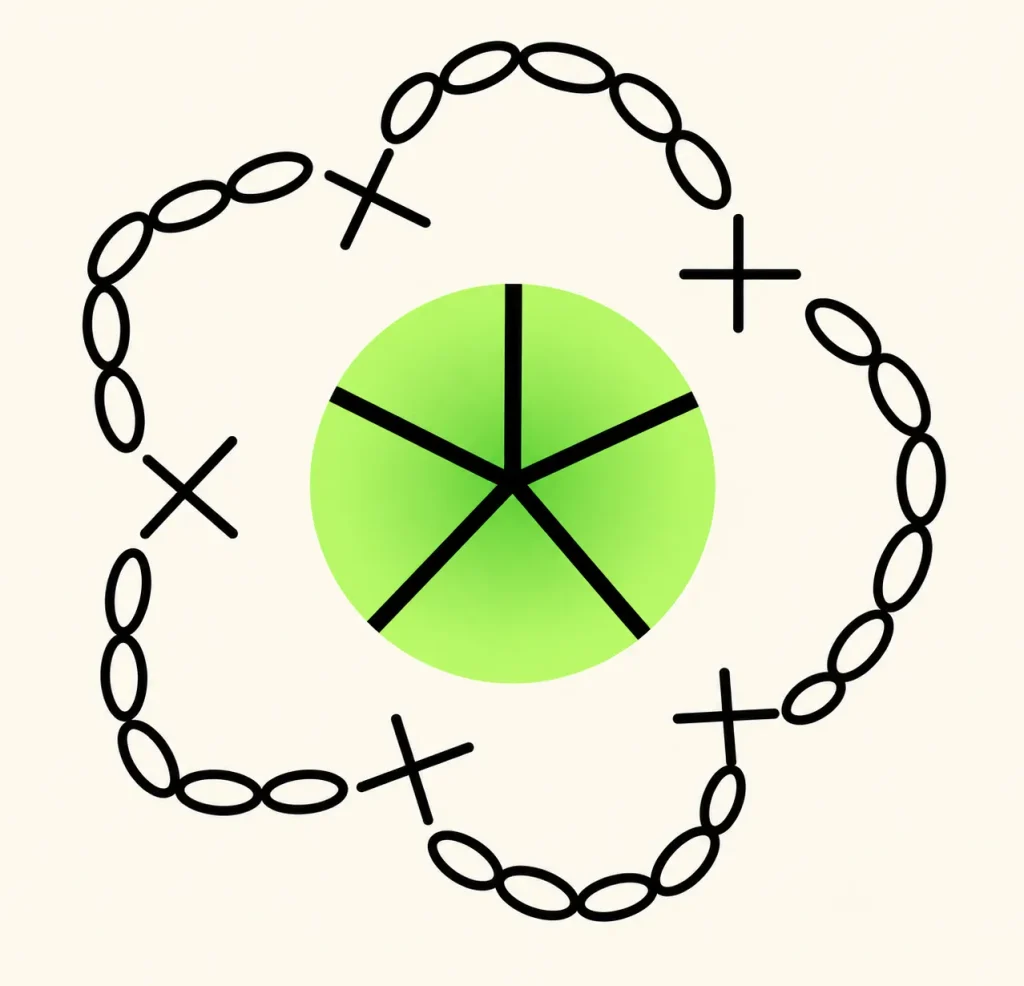
Step 4: Attach the Wire to the Corolla
Insert a length of wire into the back of the corolla and twist the ends of the wire together. This becomes the stem.
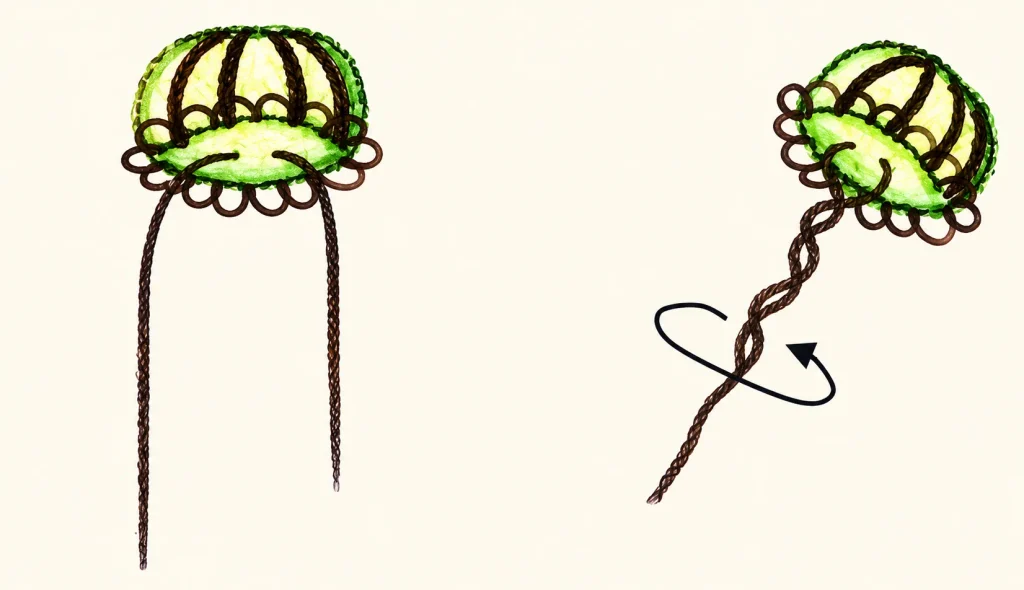
Step 5: Attach the Petals to the Corolla
Attach the four petals around the corolla.
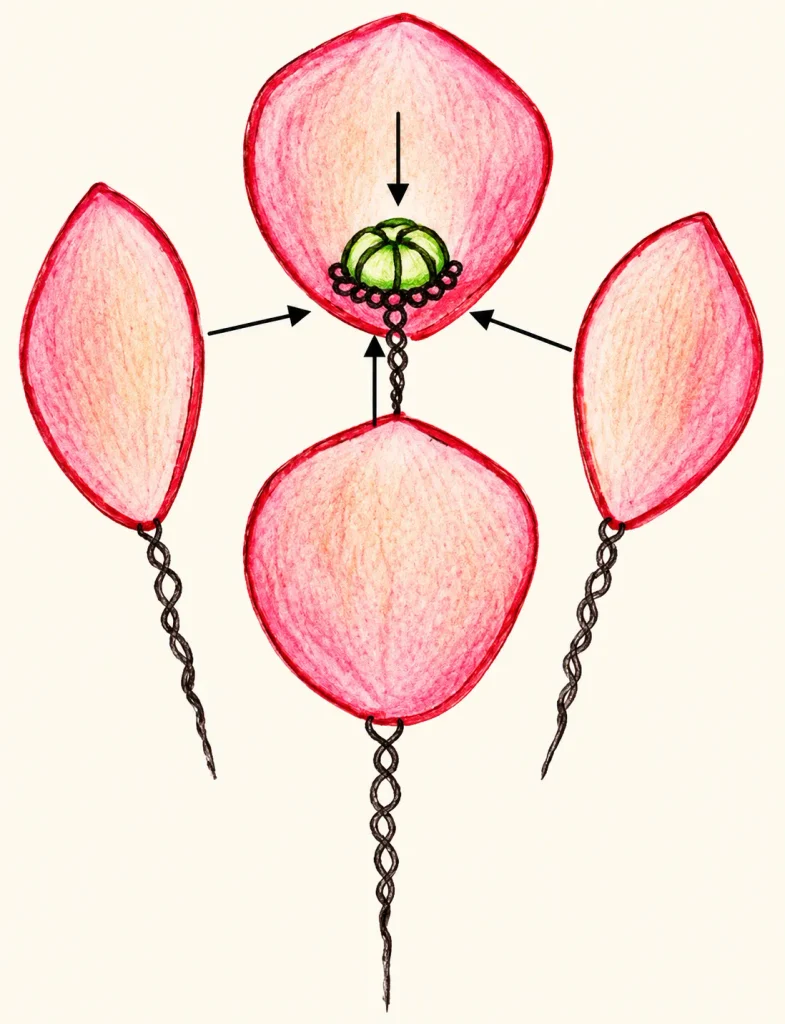
Step 6: Twist the Wires and Finish the Stem
- Twist the corresponding wires together.
- Cover the stem with green floral tape, winding it smoothly along the twisted wires.
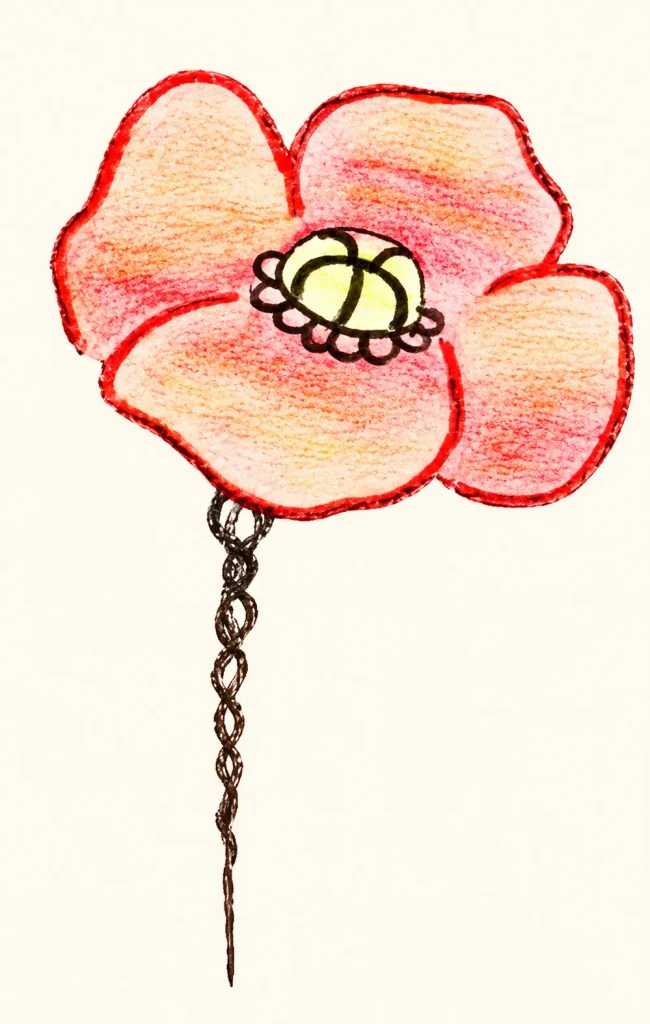
Video Tutorial
A video tutorial is available for this pattern, including the crochet button used for the corolla. If you’d rather watch the button and assembly steps than read them, embed the video here, just below the finished flower.
Tips for Making Realistic Crochet Poppies
- Keep the petals consistent. Since you’re making four, compare each new petal with the first one so they end up a similar size.
- Cover the wire completely. Work the stitches firmly around the wire so it doesn’t show along the petal edge.
- Don’t flatten the petals. Real poppies are crinkled and slightly cupped. Gently bend each petal edge and let the petals overlap a little.
- Twist the wires neatly. Tight, tidy twists make the stem stronger and easier to wrap with tape.
- Wrap the tape smoothly. Stretch the floral tape slightly as you wind it so it clings to the stem without gaps.
- Work in batches. If you’re making a bouquet, crochet all the petals first, then all the corollas, then assemble. This keeps sizes and shapes consistent across the whole set.
- Let the center stand out. A dark, textured center against red petals is what makes a poppy read as a poppy, so make sure the corolla is tidy, and its loops are even.
Common Crochet Poppy Problems and How to Fix Them
The petals look different sizes. Compare each petal with the first as you finish it. If one is noticeably off, check that you followed the same stitch counts in Rnds 2, 3, 5, and 6.
The petal edge looks wavy or uneven. Check that the wire is evenly covered and that the stitches in the wired round are worked at a consistent tension.
The wire shows through the stitches. Work the sc in Rnd 7 more firmly around the wire so the yarn covers it completely.
The petals keep slipping away from the corolla. Twist the corresponding wires together more firmly so the petals and center hold as one stem.
The stem looks lumpy. Smooth the twisted wires with your fingers before wrapping them with floral tape.
The flower looks too flat. Gently bend each petal and let the edges overlap, so the poppy has the softly cupped shape of a real one.
Color Ideas for Crochet Poppies
This pattern uses red petals with a black and soft green center, which gives the classic poppy look. The same construction also works in other color pairings if you want to experiment.
| Combination | The effect |
| Red + black center | Classic, bold, and striking |
| Coral + dark brown center | Warmer, softer, and slightly vintage |
| Orange + black center | Bright, sunny, and cheerful |
| White + soft green center | Delicate, light, and airy |
| Blush pink + dark gray center | Romantic and gentle |
Red feels bold and dramatic, orange feels sunny and playful, and white or pink poppies feel soft and romantic.
How to Make a Crochet Poppy Bouquet
A single poppy is charming, but a small group looks even better. Because the stems are wired, you can arrange them much as you would real flowers.
- Start with an odd number. Three or five poppies in a small vase already look full and natural.
- Vary the heights. Let the flower heads sit at different levels, and gently turn each one in a slightly different direction.
- Add contrast in shape. The poppy is soft and ruffled, so it pairs well with flowers that are slender or more upright.
- Choose a simple vase. A small glass jar or ceramic pitcher fits the relaxed, rustic feel of a poppy.
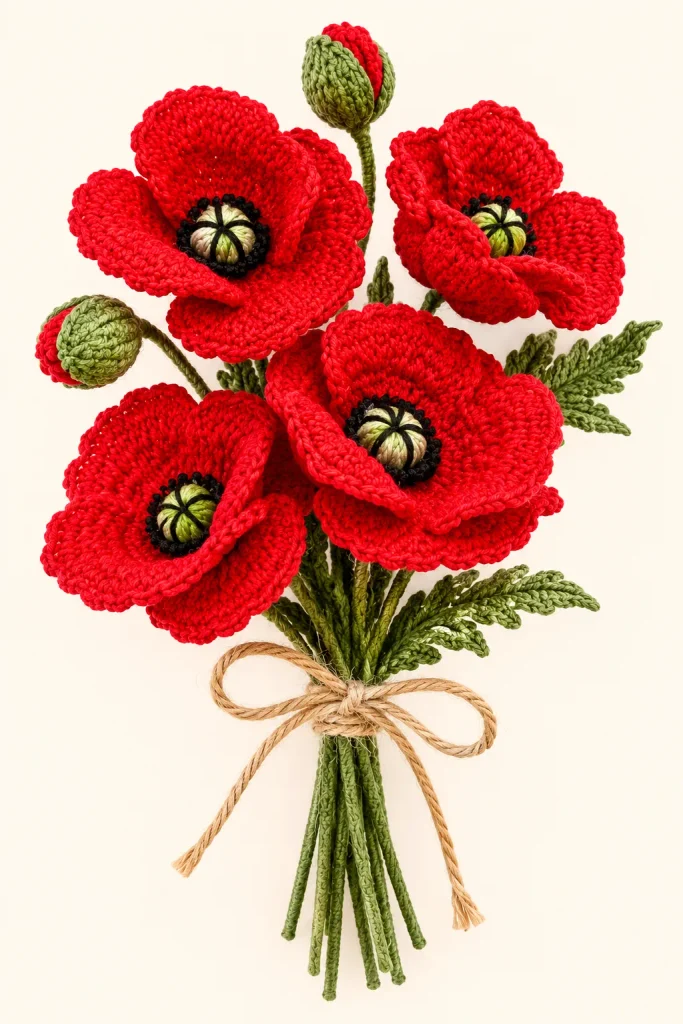
Flowers that pair well with poppies:
- Crochet lavender. Its slim purple spikes add height and a cool contrast to the warm red of the poppy. See our crochet lavender tutorial for the full pattern.
- Crochet tulips. A smooth, cup-shaped flower that contrasts with the poppy’s softer, more ruffled look. Our crochet tulip pattern is a natural companion.
- Crochet daisies. Small, flat, and cheerful, daisies add a casual, wildflower feel next to the poppy’s bold red. For ideas on using daisies in other projects, see our crochet daisy flower appliqué ideas and uses.
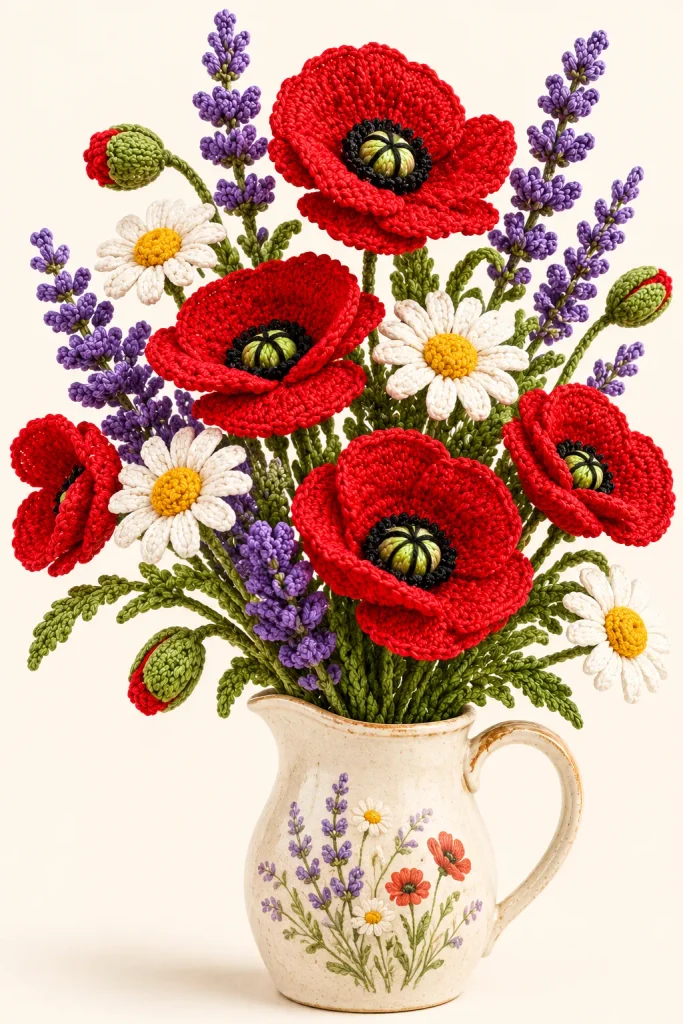
How to Use Crochet Poppies
- Single stems in a small vase for a bright accent on a shelf or windowsill.
- Wildflower-style bouquets mixed with lavender, daisies, and tulips.
- Handmade gifts, such as a small bouquet wrapped in kraft paper or ribbon.
- Rustic home decor, tucked into baskets, wooden crates, or mason jars.
- Table centerpieces for spring and summer gatherings.
- Gift toppers, with a single stem tucked into the ribbon of a wrapped present.
- Remembrance displays. The red poppy is widely used as a symbol of remembrance, so a few crochet poppies can make a meaningful, lasting tribute.
Caring for Your Crochet Poppies
Crochet poppies don’t wilt, so they keep their shape for as long as you want to display them. A few habits will keep them looking fresh.
- Keep them away from damp areas. Moisture can affect the wire and the floral tape.
- Avoid strong direct sun. Long exposure can fade colors over time, especially bright reds.
- Dust them gently. A soft, dry brush or a light shake keeps the petals looking clean.
- Store them carefully. If you put them away, lay them flat or stand them upright in a box so the petals don’t get crushed.
Frequently Asked Questions
What yarn is used for this crochet poppy?
This pattern uses Cotton 8 in red for the petals, with black and soft green for the center. A smooth cotton gives the flower a clean finish.
What hook size should I use?
Use a size B (1.90 mm) hook.
How many petals does the poppy have?
Four. You make each petal separately, then attach them all to the corolla.
What is the wire for?
The 0.6 mm wire is worked into the edge of each petal so it can be shaped, and it also forms the stem when the wires are twisted together.
How do I make the stem look finished?
Cover the twisted wires with green floral tape, winding it smoothly from top to bottom.
Can I make poppies in other colors?
Yes. The same construction works in other colors, though this tutorial uses red petals with a black and soft green center.
What if I don’t understand the abbreviations?
Our guide to crochet symbols and abbreviations explains common terms in plain language.
What other flowers go well with a crochet poppy?
Crochet lavender, tulips, and daisies all pair well, since they add contrasting shapes and colors.
More Crochet Ideas & Inspiration
Looking for your next crochet project? Visit our shop to explore our crochet patterns and find your next handmade project.
Follow us on Pinterest and Instagram for more crochet ideas and inspiration for your next project. We’d love to have you join our crochet community!