

Pattern & Copyright Note: Crochet patterns may vary slightly depending on your yarn, hook size, and personal tension. Use the measurements and instructions as a guide, and adjust your tension as needed. This CrochetFloria tutorial, including its instructions, photos, and original content, is protected by copyright. You’re welcome to make the finished project for personal use or as a gift. Please do not copy, republish, or redistribute the pattern or photos. To share it, please link to the original CrochetFloria article.
Affiliate Disclosure: We earn from qualifying purchases made through the affiliate links in this article, at no extra cost to you. We only recommend products that may be useful for your crochet projects.
Few crochet flowers feel as instantly recognizable as the daisy. That ring of slim white petals around a sunny yellow center reads “daisy” from across the room, which is exactly why it’s such a satisfying motif to have in your crochet toolkit. It’s small enough to finish in one sitting, forgiving enough for a confident beginner to attempt, and versatile enough to end up in a dozen different projects once you know how to make one.

What makes this particular daisy construction interesting is the order it’s worked in. Instead of building outward from a center like most crochet flowers, this pattern starts with what becomes the back of the flower, then adds petals into it afterward, then finishes with a separate puffed center disk sewn on top. That layered build is part of why the finished flower has real dimension instead of lying completely flat.
This guide walks through how the daisy comes together stage by stage, what to expect at each point, how to size and color it, and the different ways a finished daisy — or a handful of them — can actually be used once you’re off the hook.
Before starting, we’ve got some other related Crochet articles, Take a Look:
- How to Crochet a Sunflower for Home Decor and Gifts
- How to Crochet a Rose: Easy Step-by-Step Flower Tutorial
Save This on Pinterest!
No time to read this Crochet a Daisy? Click on the save button and pin it for later!
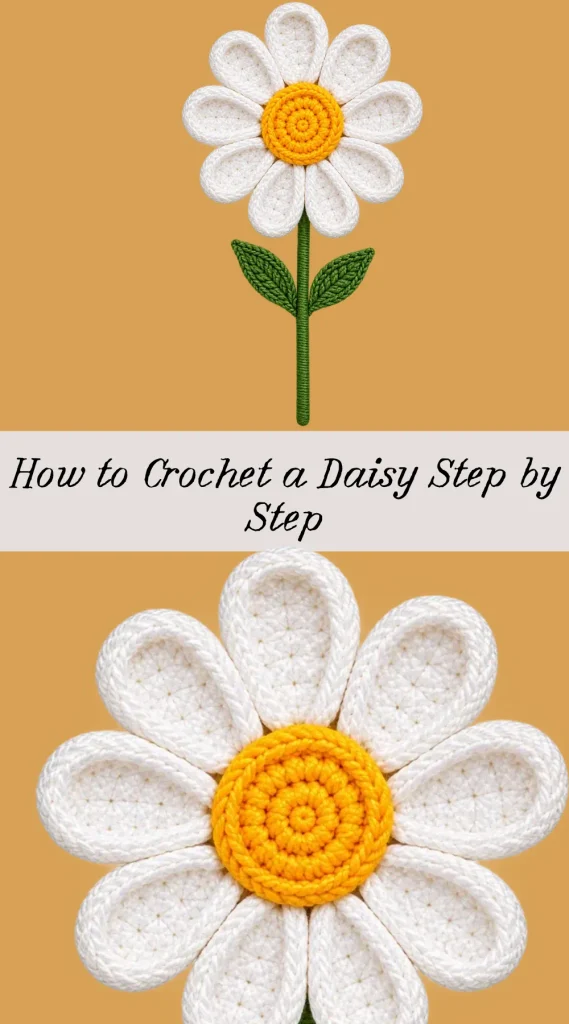
Quick Guide
| Detail | Info |
| Skill level | Beginner-to-easy, with some fiddly small-scale stitching |
| Yarn | Lace-weight cotton (white, yellow, green) |
| Hook | 1.75mm |
| Finished size | About 4cm diameter |
| Petal count | 10 |
| Stem | Optional 20cm florist wire |
| Best for | Bouquets, wreaths, hair accessories, small home accents |
What You’ll Need to Crochet a Daisy
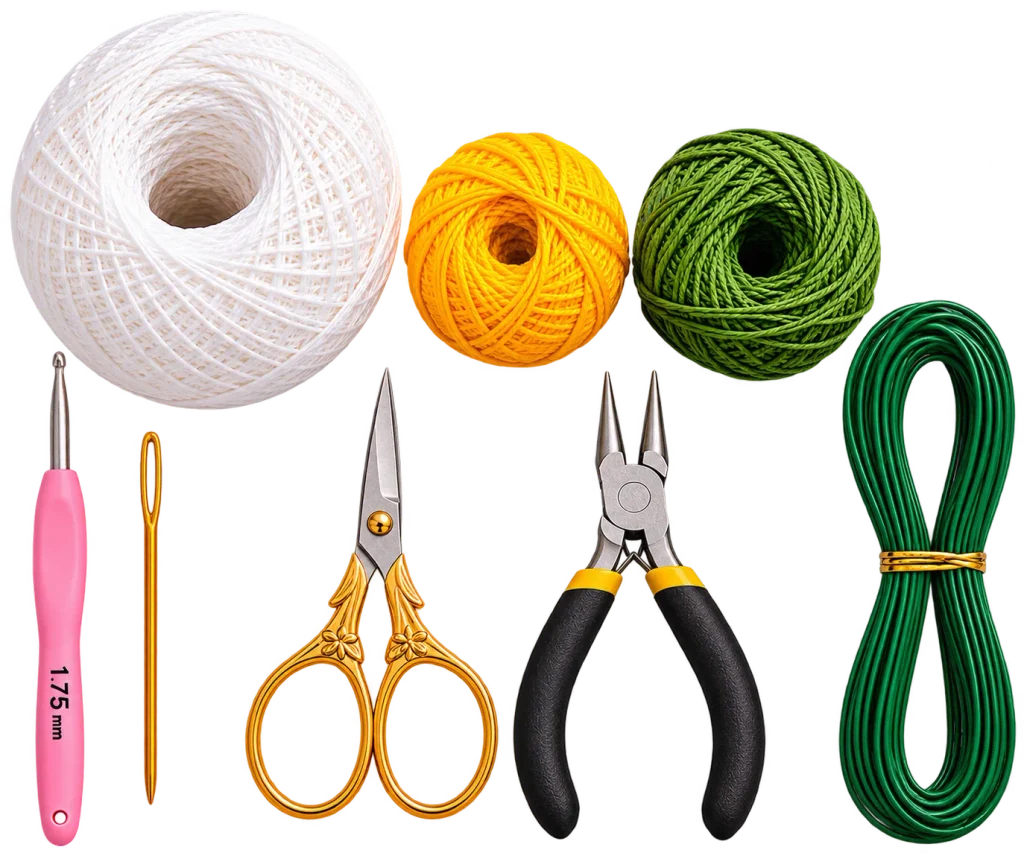
This pattern is worked in fine lace-weight cotton, which is what gives daisy petals their crisp, papery look instead of a bulkier, more casual texture. Here’s what goes into one flower:
- White lace cotton yarn (about 25 meters) for the petals
- Yellow lace cotton yarn (about 15 meters) for the center
- Green lace cotton yarn (about 10 meters) if you’re wrapping the stem
- A 1.75mm crochet hook
- A yarn needle for weaving in ends and sewing the center in place
- Scissors
- 20cm of florist wire
- Cutting pliers to trim the wire
You can substitute any yarn you have in your stash — this is a project that’s genuinely friendly to scrap yarn, since the amounts needed are small. What matters more than brand or fiber is matching your hook to your yarn weight rather than sizing up for speed, since a finer thread and smaller hook are what keep the petals tight and well-shaped instead of loose and floppy.
If you don’t have florist wire on hand, pipe cleaners are a reasonable substitute for a softer, more bendable stem, though they won’t hold a pose quite as crisply as florist wire does once the flower is arranged.
Crochet Supplies Quick Links
Explore useful supplies and tools for your crochet projects. These shopping links make it easier to find materials and accessories for your next handmade creation
- Cotton Yarn – Find cotton yarn in different colors for your flower.
- Cotton 8 Yarn – Browse yarn options for small crochet projects.
- Crochet Hooks – Find the right hook for your crochet work.
- Floral Wire – Useful for shaping petals and making flower stems.
- Green Florist Tape – Wrap and finish your crochet flower stems.
- Shop LoveCrafts – Discover more yarn and craft supplies.
Crochet Daisy Size and Finished Measurements
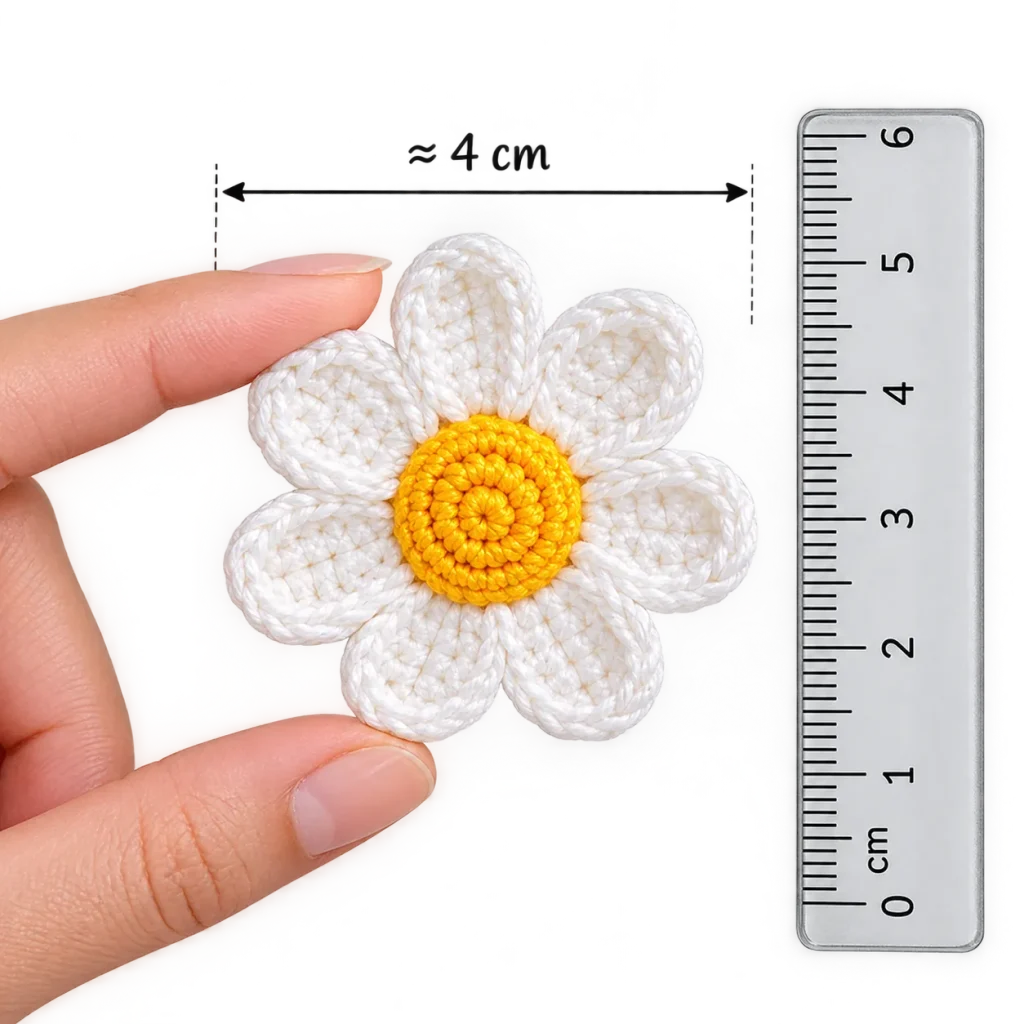
There’s no fixed gauge for this pattern — instead, the goal is tight, even stitches, which is easier to achieve with the smallest comfortable hook for your yarn. Worked in lace-weight cotton with a 1.75mm hook, the finished flower measures about 4cm across, which is close to the scale of a real daisy bloom.
If you switch to a heavier yarn and larger hook, expect a noticeably bigger flower. That’s not a downside — it just changes what the daisy is suited for. A true-to-scale lace version photographs beautifully in a delicate bouquet or tucked into a bud vase, while a scaled-up version in DK or worsted weight reads more like a statement bloom, better suited to a wreath, a tote bag embellishment, or anywhere you want the flower to be the clear focal point rather than one of several small blooms.
How to Crochet the Daisy Center
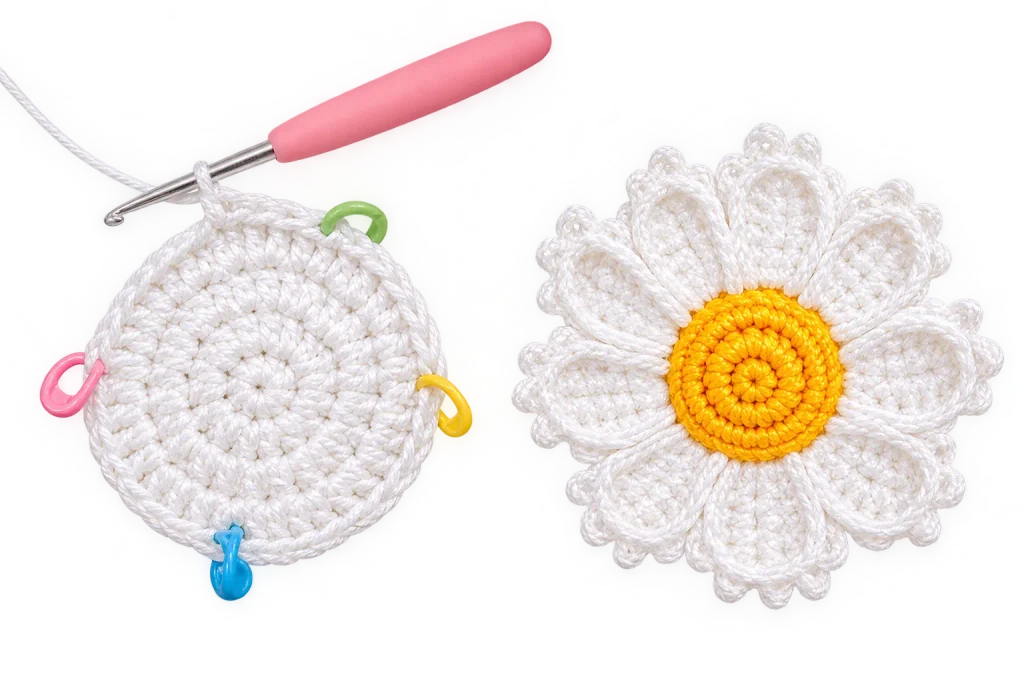
The construction here is a little different from a lot of crochet flowers, which usually build outward from a petal ring. This daisy starts from what becomes the back of the flower, called the receptacle, and the petals are added afterward from its back loops.
Working in white, you begin with a small foundation ring, then build it outward in rounds of single crochet, increasing steadily so the circle lies flat rather than cupping or ruffling. Getting this early stage flat matters more than it might seem — a receptacle that cups even slightly will throw off how evenly the petals sit once they’re added, since they’re all worked from the same base round.
The final round of the receptacle finishes with a picot edge — a row of small decorative loops made by chaining a few stitches and slip stitching back into them. This gives the back of the daisy a neat, finished look, which is a nice touch even though the picot edge is usually hidden once the flower is displayed face-forward.
How to Crochet the Daisy Petals
This is where the flower really takes shape, and it’s also the part most people find the most satisfying to watch come together. Instead of working into the last round of the receptacle, you go back and work into the back loops of an earlier round. That detail is what creates the layered, dimensional look of the petals sitting slightly behind and below the puffed center, rather than everything lying in one flat plane.
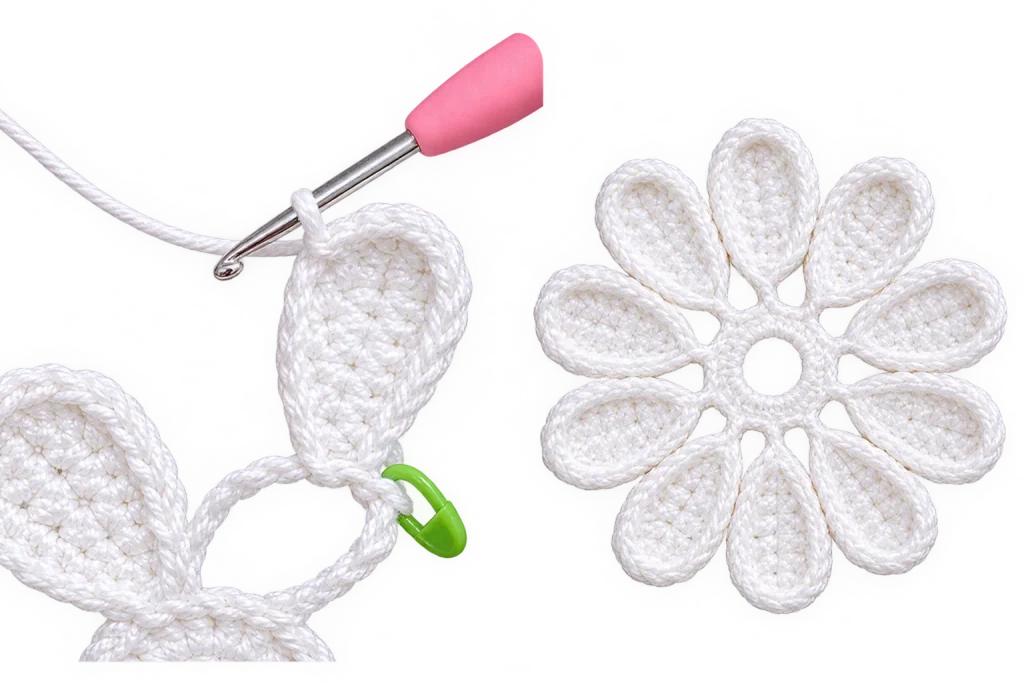
Each petal is built as its own small chain arch: a short chain, then a mix of single, double, and treble crochet stitches worked back along it to taper the shape into a rounded point rather than a flat oval. You repeat this all the way around the circle — ten petals total — slip stitching into the base of the next stitch each time so the petals sit evenly spaced with no visible gaps or overlaps between them.
Ten petals is enough to read clearly as a daisy without looking sparse or skeletal, and it’s a manageable number to keep track of as you work, especially if this is your first time trying a petal-arch construction like this one. Dropping a stitch marker on every second or third petal as you go is a simple way to stay oriented without having to recount from the beginning if you lose your place partway around.
How to Join and Shape the Daisy
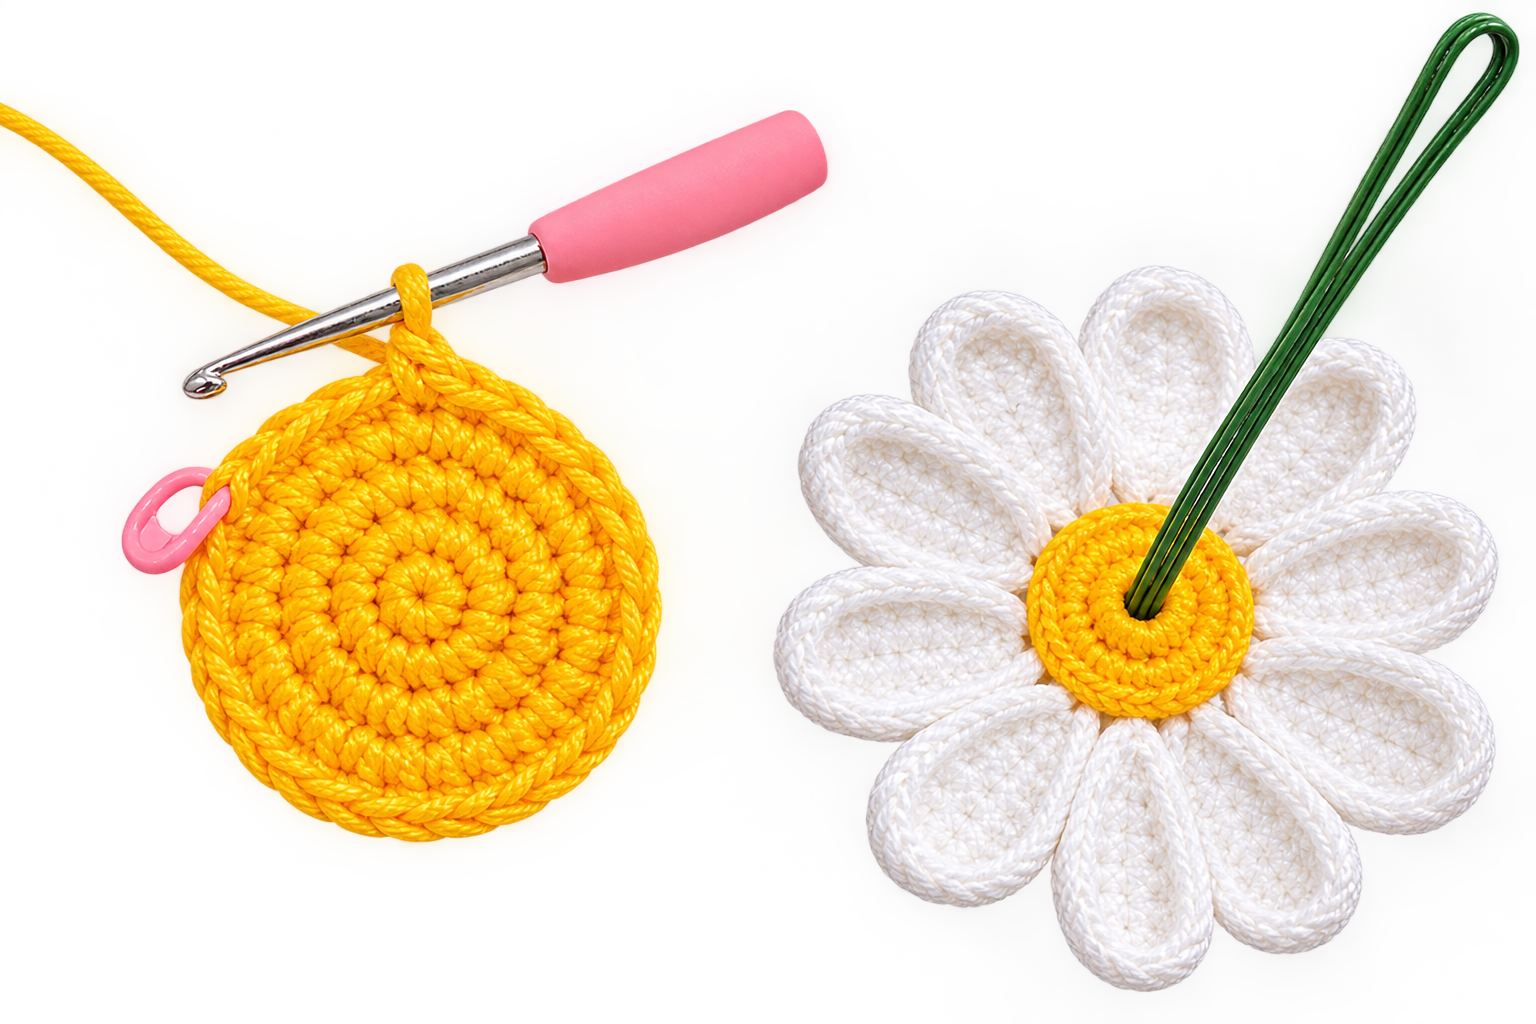
Once the petal round is fastened off, the flower already looks recognizably like a daisy, but it’s missing its most eye-catching feature: the center. That center is made separately as a small puffed disk, worked in yellow from its own foundation ring and built up with rounds of single crochet packed closely together.
The technique that makes this center distinctive is working back over the first round a second time — essentially stitching on top of your own stitches — which pushes everything back behind the circle and plumps it into a rounded, button-like shape instead of a flat disk. This is what gives a crochet daisy its slightly raised, textured middle, rather than a flat dot of color sewn on top. It’s a small technique, but it’s genuinely the difference between a flower that looks handmade-charming and one that looks a little unfinished.
How to Finish Your Crochet Daisy
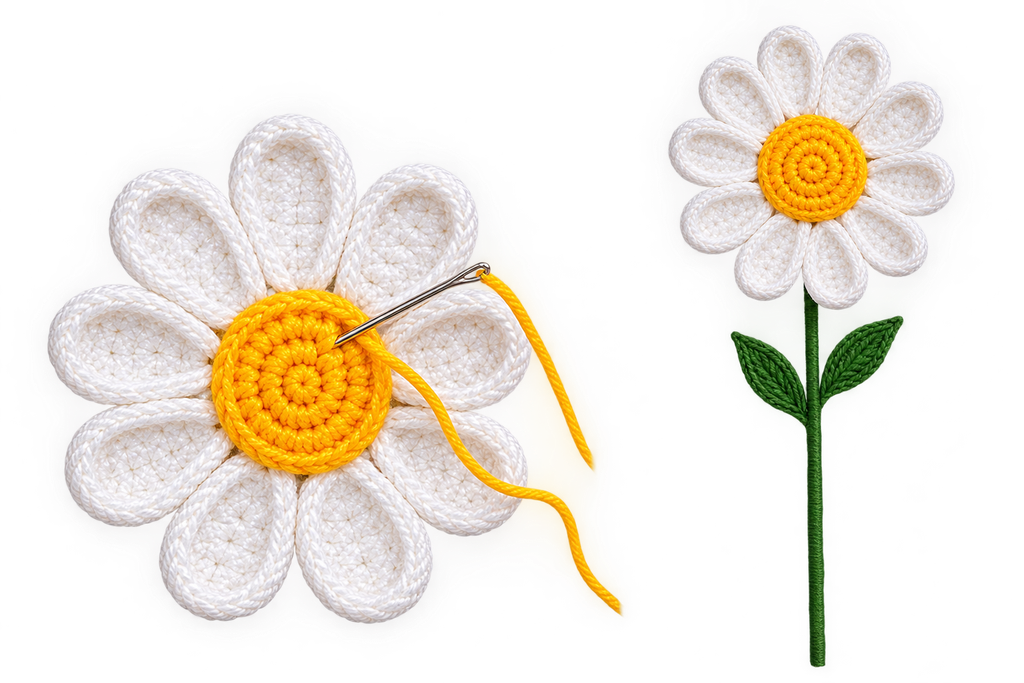
Before the pieces come together, the stem goes in. A length of florist wire is folded in half and inserted through the center of the receptacle’s foundation ring, then folded back over itself and twisted below the petals to lock it in place. This step is what lets the finished daisy hold a pose instead of flopping, which matters more than you’d think once you’re trying to arrange several of them together in a bouquet or a vase.
From there, the yellow center disk is placed on top of the receptacle and sewn down using its own long yarn tail, worked around the edge until it’s secure. Any remaining ends get woven in on the back side. A light blocking pass — gently reshaping and flattening the petals by hand, or pinning them briefly under light steam if they’re stubborn — helps the petals sit open and even rather than curling inward, which lace-weight cotton is especially prone to doing straight off the hook.
Easy Ways to Customize Your Crochet Daisy
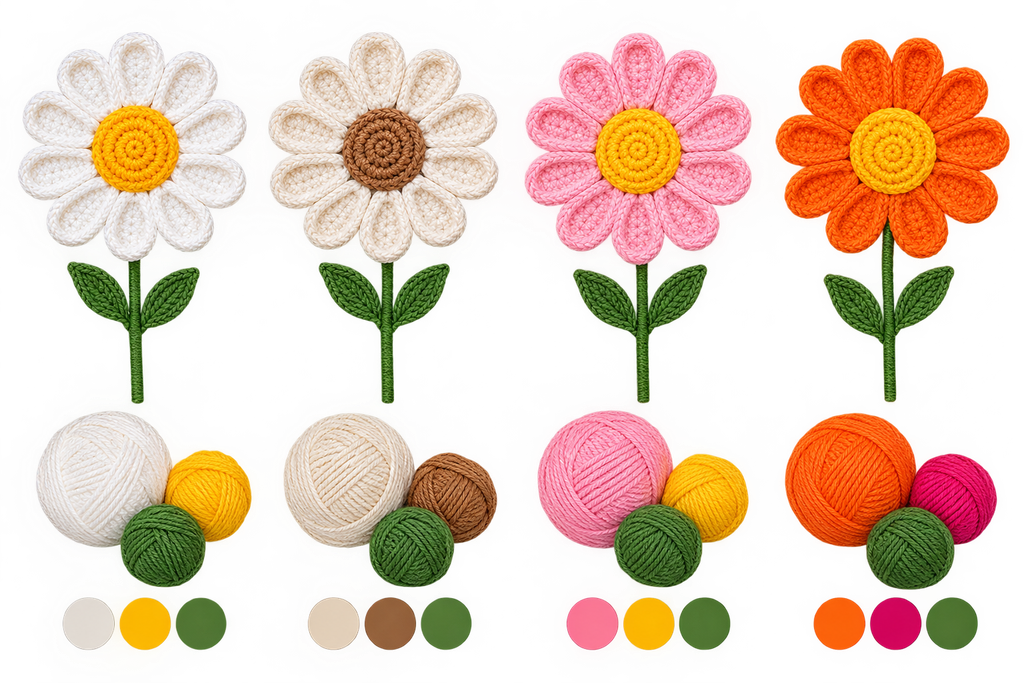
The classic white-and-yellow combination is a classic for a reason — it’s the color pairing everyone recognizes instantly as “daisy.” But because the petals and center are worked as two separate pieces, this same construction adapts easily to other palettes:
Cream petals with a soft brown center give the flower a dried-botanical, neutral look. This combination leans into a boho or farmhouse aesthetic and photographs particularly well against wood tones and linen.
Pale pink or lavender petals with a deeper yellow or gold center shift the daisy into a softer, more romantic register, closer in feeling to a cosmos or an English daisy. This works well for anything gift-oriented — a bridal shower favor or a spring birthday gift, for example.
Bright petals in orange, red, or fuchsia push this construction closer to a gerbera daisy. It’s a good option once you’re comfortable with the base pattern and want a bolder accent piece rather than a soft, muted one.
Deep-toned petals in burgundy or rust with a black or dark brown center move the whole flower into autumn territory, closer to a black-eyed Susan than a spring daisy, and pair nicely with the kind of warm, seasonal palette a lot of fall home decor leans on.
Contrast is worth thinking about deliberately here. A deep, saturated center against pale petals reads as more graphic and modern in photos, while closely related tones — a buttery yellow center against ivory petals, say — feel softer and more traditional. Neither is more “correct”; it’s really about which mood fits the project you’re making it for.
What Can You Make With Crochet Daisies?
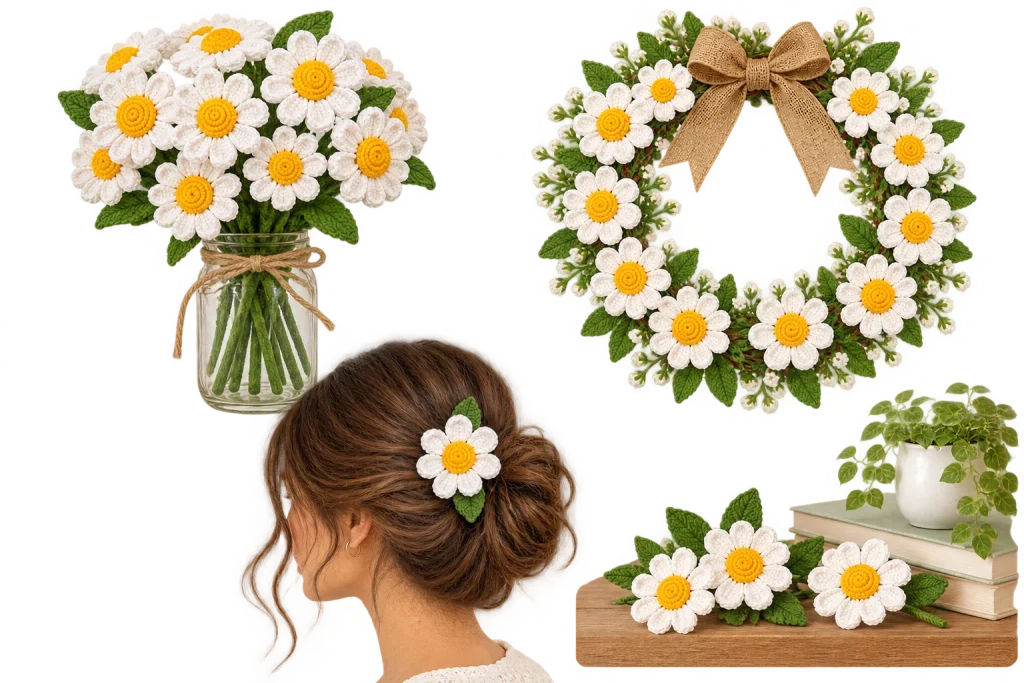
A single daisy on a wire stem is really the starting point rather than the whole project. Because each flower is compact and already wired for shaping, they’re easy to multiply and combine.
Bouquets are the most obvious use, and a handful of daisies in mixed white, cream, and pale yellow, wrapped together with green yarn or floral tape along the stems, makes a satisfying standalone arrangement. They also work well as filler alongside larger crochet blooms like roses or peonies, adding texture without competing for attention.
Wreaths are a good option if you’d rather skip the wire step, or trim the stems short and bend them into small loops instead. A base wreath form scattered with a cluster of daisies in one or two colors makes a simple, non-fussy spring or summer piece.
Hair accessories and pins turn a single daisy into a quick handmade gift. Glued or sewn onto a hair clip or brooch back, one flower is often enough — especially if you’ve sized it up slightly with a heavier yarn so it reads clearly from a distance.
Home accents don’t need to be complicated. A few loose daisies tucked into a small bud vase, propped in a planter alongside a real (or faux) plant, or clustered loosely on a shelf bring a handmade, garden-fresh feel to a space without needing to be arranged into anything formal at all.
Gift wrapping and cards are a smaller-scale use worth mentioning — a single daisy stitched or glued onto a gift tag or the corner of a handmade card adds a dimensional, botanical touch that a printed flower simply can’t match.
How Crochet Daisies Compare to Other Crochet Flowers
If you’re deciding whether a daisy is the right flower to start with, it helps to know how it stacks up against other common crochet flower shapes.
Compared to a crochet rose, which is typically built as one continuous spiral or a series of layered rounds, the daisy is a faster, more segmented project — you’re working the receptacle, the petals, and the center disk as three distinct, fairly quick pieces rather than one long continuous build. That makes it a more forgiving place to pause partway through.
Compared to a simple layered flower (the kind made from two or three stacked rounds of picot-edge petals), the daisy takes a bit more patience because of the separate wired stem and sewn-on center, but it also produces a more three-dimensional, realistic result. If you want something you can make quickly in one sitting with minimal assembly, a layered flower is the simpler choice. If you want something that looks convincingly like a real daisy on a stem, this construction is worth the extra steps.
For bouquets specifically, daisies pair well as a supporting flower rather than the only one — their slim petals and small scale give a bouquet texture and fill gaps between larger, showier blooms.
Tips for Making Even Crochet Daisy Petals
A few habits make a noticeable difference in how uniform your petals turn out.
Keep your tension consistent across all ten petals by working them in one uninterrupted sitting where possible, rather than spreading the round across several separate sessions — tension tends to drift slightly session to session, even when you’re not trying to change it.
Count your stitches into each petal’s chain arch every single time rather than eyeballing it. Even one extra stitch will make that petal visibly longer than its neighbors, and because the petals sit close together, a length mismatch is easy to spot in the finished flower.
Block the finished flower even if the petals look fine straight off the hook. Lace-weight cotton holds a shape well once it’s been damp-blocked, and this step tends to even out small inconsistencies that aren’t obvious until the flower is laid flat and dry.
Work with good lighting and, if your eyesight makes fine lace-weight stitches hard to track, consider a hook with a built-in light or a well-lit spot near a window. Losing track of a stitch in yarn this fine is common and easy to do, and it’s usually the root cause of uneven petals rather than a lack of skill.
Common Crochet Daisy Mistakes and How to Fix Them
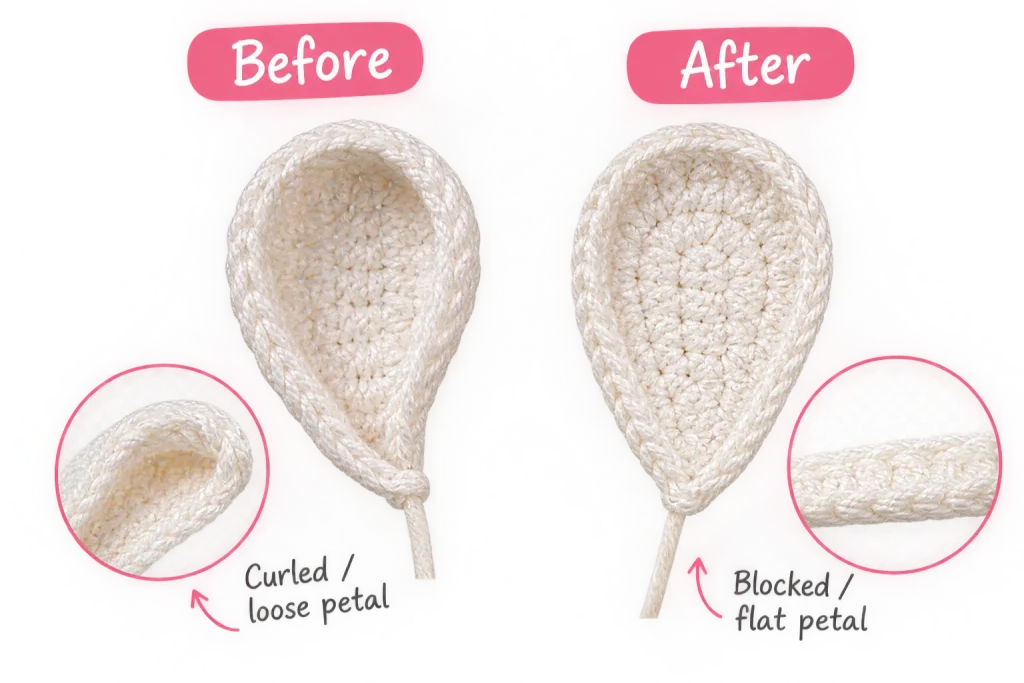
Petals that curl or twist. This usually means the stitches are a little loose. Dropping down a hook size, or simply blocking the finished flower flat with a light steam or damp-press, can correct it without needing to restitch anything.
A center hole still visible on the floral disk. Keep working single crochet stitches over the first round until the gap fully closes — it often takes more stitches than you’d expect to fill a small ring completely, especially in fine yarn.
A stem that won’t hold its position. Make sure the wire is twisted firmly below the petals before you attach the center disk, since that twist is what anchors it in place. A loose wrap will let the flower head droop or spin on the stem over time.
Uneven petal spacing. This is almost always a stitch-count issue in the base round rather than a problem with the petals themselves. Placing a marker at each join point as you work makes it much easier to catch a miscount before it throws off the whole flower.
Petals that look flat instead of dimensional. This can happen if the petal round is accidentally worked into the same round as the receptacle’s last round, rather than into the back loops of an earlier round as the pattern calls for. Going back to the correct round is what gives the flower its layered depth.
Crochet Daisy Pattern
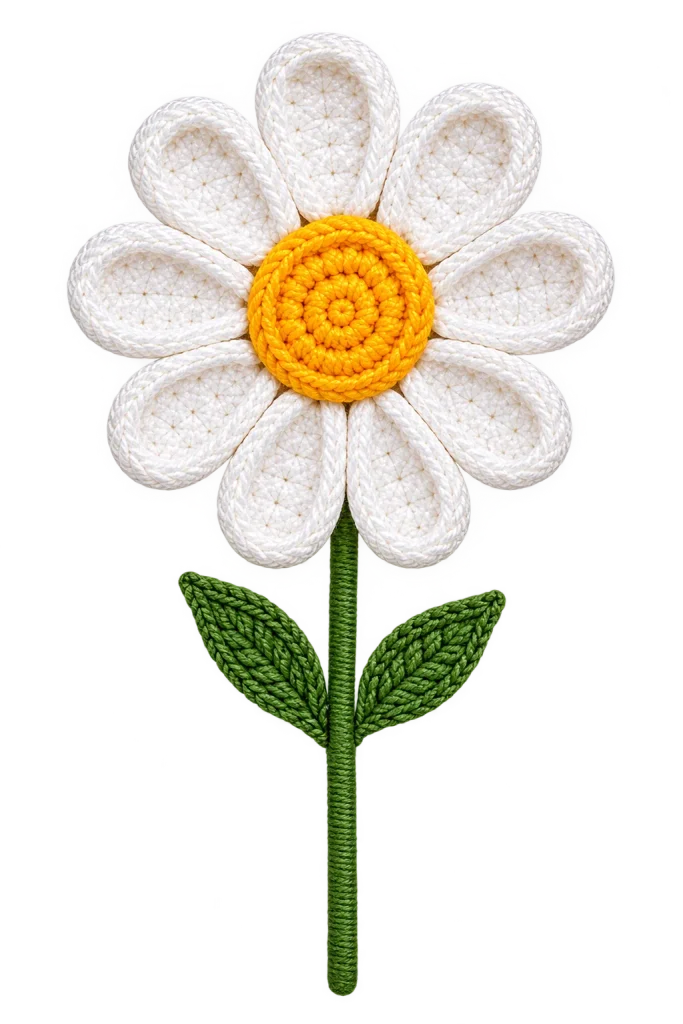
Materials: 25m white lace cotton yarn, 15m yellow lace cotton yarn, 10m green lace cotton yarn, 1.75mm crochet hook, yarn needle, scissors, 20cm florist wire, cutting pliers
Gauge: None specified — use the smallest hook that keeps your stitches tight for your chosen yarn.
Finished size: Approximately 4cm in diameter (using lace-weight cotton and a 1.75mm hook)
Receptacle
Worked in white, starting from a foundation ring and building up in rounds of single crochet, finishing with a picot edge around the outer round — 10 picots total.
Petals
Worked in white into the back loops of the receptacle’s second round: ten individual chain-arch petals, each shaped with a mix of single, double, and treble crochet stitches, joined with a slip stitch between each one.
Floral Disk
Worked in yellow from a small foundation ring, built up with rounds of tightly packed single crochet, then worked over a second round to create a raised, puffed center.
Stem
A 20cm length of florist wire, folded in half and inserted through the receptacle’s foundation ring, then folded back and twisted to secure.
Assembly
Center the floral disk over the receptacle and sew in place using the long yarn tail. Weave in all ends and block to help the petals lie flat and even.
More Crochet Flower Patterns to Try
If the daisy’s receptacle-first construction and back-loop petal technique feel good in your hands, it’s worth exploring other flower shapes that build on similar techniques. A puffed center disk, a wired stem, and layered petal rounds show up across a lot of crochet flower patterns, just recombined in different proportions, petal shapes, and stitch counts — so the skills from this project carry over well.
Crochet Flower (FAQ)
Can I make a crochet daisy without wire?
Yes — the wire is mainly there to give the finished flower a sturdy, posable stem for arranging in a vase or bouquet. If you’re using the daisy as an appliqué or attaching it flat to something like a hair clip or bag, you can skip the wire step entirely.
What yarn weight works best for this pattern?
Lace-weight cotton with a fine hook gives the crisp, true-to-scale look shown here. Heavier yarn will produce a larger, chunkier flower, which isn’t wrong, just a different aesthetic — better suited to bolder decor pieces than delicate bouquets.
Why does the pattern start with the back of the flower?
Working the receptacle first and adding petals into its back loops is what creates the layered depth of the finished daisy — the petals sit slightly forward of the center rather than lying flat in a single ring, which reads as more three-dimensional and lifelike.
How many petals does a crochet daisy need?
This pattern uses ten, which balances a full, believable daisy shape with a petal count that’s easy to keep track of while stitching. Fewer petals will look sparse; a lot more can start to overlap and lose their individual shape.
Can I use a different color for the center instead of yellow?
Yes — brown or cream centers give a softer, more neutral look, while bright yellow reads as the most classic, true daisy appearance.
How long does one daisy take to make?
No official timing is specified for this pattern, but because it’s worked in three small separate pieces — receptacle, petals, and center — most crocheters find it a manageable project to finish in one relaxed sitting rather than something that needs to be split across several days.
Looking for your next crochet project? Here are a few more ideas to try:
[…] Pattern & Copyright Note: Crochet patterns may vary slightly depending on your yarn, hook size, and personal tension. Use the measurements and instructions as a guide, and adjust your tension as needed. This CrochetFloria tutorial, including its instructions, photos, and original content, is protected by copyright. You’re welcome to make the finished project for personal use or as a gift. Please do not copy, republish, or redistribute the pattern or photos. To share it, please link to the original CrochetFloria article. […]
[…] Pattern & Copyright Note: Crochet patterns may vary slightly depending on your yarn, hook size, and personal tension. Use the measurements and instructions as a guide, and adjust your tension as needed. This CrochetFloria tutorial, including its instructions, photos, and original content, is protected by copyright. You’re welcome to make the finished project for personal use or as a gift. Please do not copy, republish, or redistribute the pattern or photos. To share it, please link to the original CrochetFloria article. […]