

Pattern & Copyright Note: Crochet patterns may vary slightly depending on your yarn, hook size, and personal tension. Use the measurements and instructions as a guide, and adjust your tension as needed. This CrochetFloria tutorial, including its instructions, photos, and original content, is protected by copyright. You’re welcome to make the finished project for personal use or as a gift. Please do not copy, republish, or redistribute the pattern or photos. To share it, please link to the original CrochetFloria article.
Affiliate Disclosure: We earn from qualifying purchases made through the affiliate links in this article, at no extra cost to you. We only recommend products that may be useful for your crochet projects.
Tulips have a shape that’s instantly satisfying to recreate in yarn: that closed, rounded bud sitting on a tall, straight stem, with a soft seam where the petals overlap. Unlike a lot of crochet flowers that open flat and show off layers of petals, a tulip stays gathered and upright, which gives it a completely different presence once it’s finished. It looks equally at home standing alone in a bud vase or gathered into a full spring bouquet.
This guide walks through how a crochet tulip comes together, piece by piece, from the flower head down to the leaves, along with the exact sizing and materials the pattern calls for, plus color options and ideas for using the finished flowers once they’re off your hook.
Before starting, we’ve got some other related Crochet articles, Take a Look:
- How to Crochet a Sunflower for Home Decor and Gifts
- How to Crochet a Rose: Easy Step-by-Step Flower Tutorial
Save This on Pinterest!
No time to read this Crochet a Tulip? Click on the save button and pin it for later!
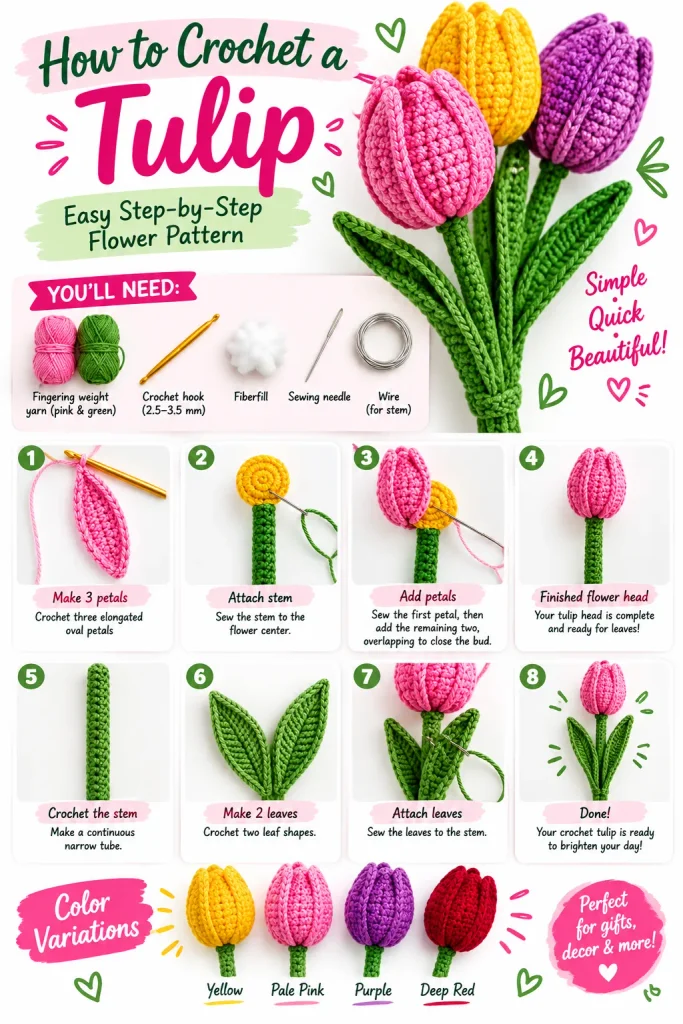
Quick Guide
| Detail | Info |
| Yarn weight | Fingering or super fine |
| Yarn amount | About 70 yards total |
| Finished size | About 7.08 inches (18cm) tall |
| Colors used | Pink and green |
| Petals | 3, sewn to close the bud |
| Leaves | 2 (one short, one long) |
| Stem support | Wire inserted through a crocheted tube |
What You’ll Need to Crochet a Tulip
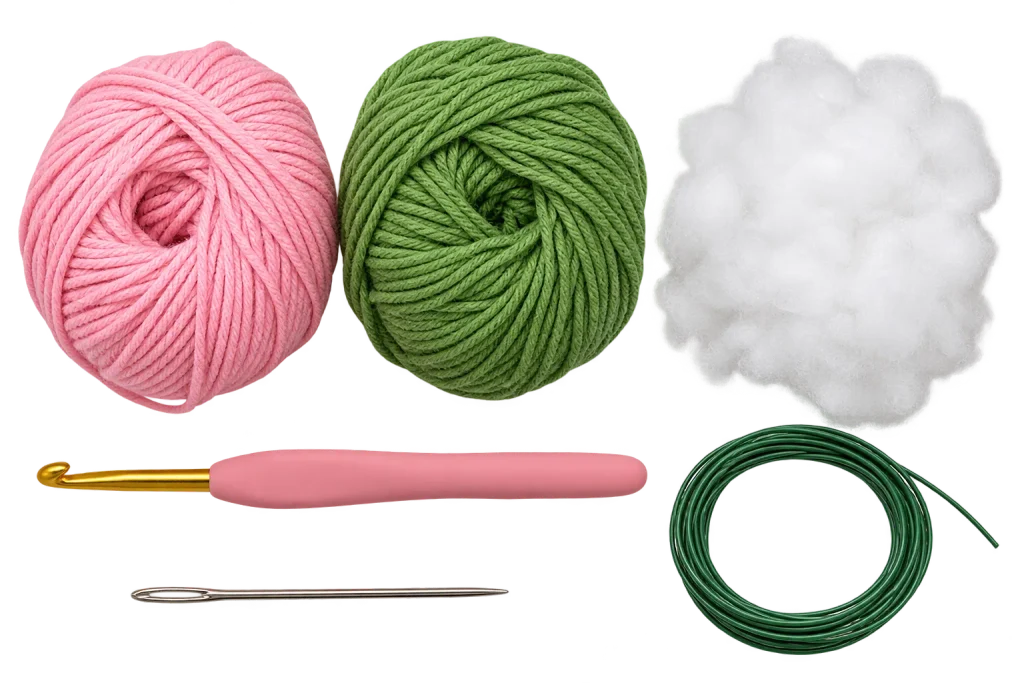
This tulip is worked in fingering or super fine weight yarn, which gives it a fine, defined stitch texture rather than a bulky, oversized look. Here’s exactly what the pattern calls for:
- Pink yarn (fingering or super fine weight) for the petals and flower center
- Green yarn (same weight) for the stem and leaves
- A hook sized to suit your yarn
- Fiberfill for stuffing the flower head and stem
- A sewing needle for assembly
- Wire, inserted into the finished stem for support
You’ll need approximately 70 yards of yarn total to complete one flower. A separate, finer thread for sewing the pieces together is worth having on hand too. It creates a neater seam than sewing with the working yarn itself, especially around the smaller attachment points like the petals.
Because the flower head, stem, and leaves are worked as individual pieces and assembled afterward, this is a project you can pick up and set down between pieces without losing your place, which makes it easy to spread across a few short sessions rather than needing one long sitting.
Here’s the final version I recommend using across CrochetFloria pattern articles:
Crochet Supplies Quick Links
Explore useful supplies and tools for your crochet projects. These shopping links make it easier to find materials and accessories for your next handmade creation
- Cotton Yarn – Find cotton yarn in different colors for your flower.
- Cotton 8 Yarn – Browse yarn options for small crochet projects.
- Crochet Hooks – Find the right hook for your crochet work.
- Floral Wire – Useful for shaping petals and making flower stems.
- Green Florist Tape – Wrap and finish your crochet flower stems.
- Shop LoveCrafts – Discover more yarn and craft supplies.
Crochet Tulip Size and Finished Measurements
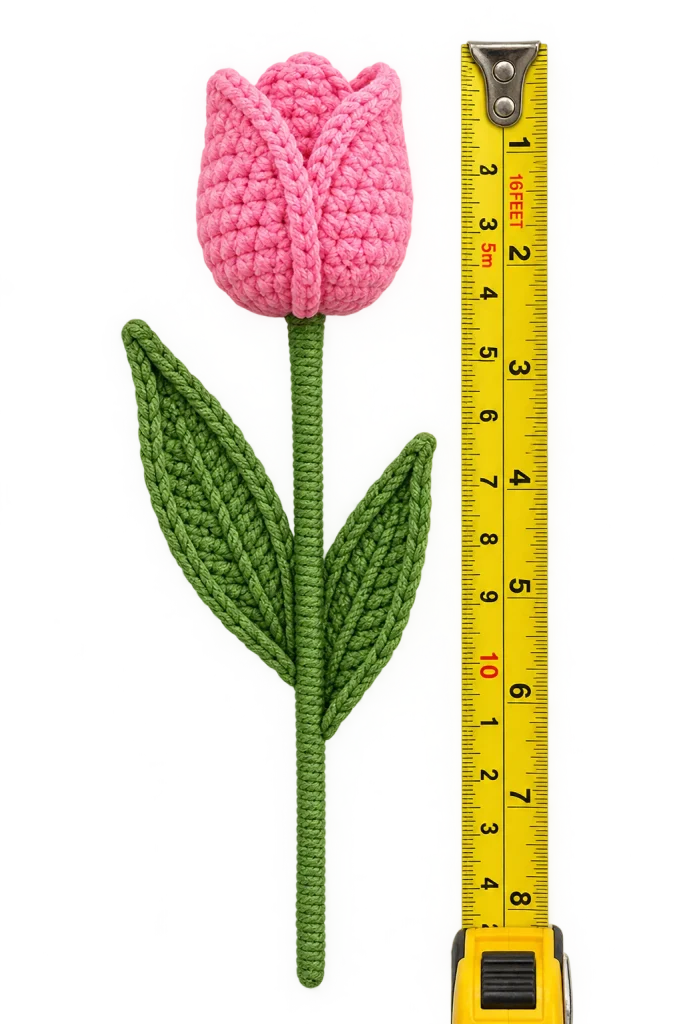
Any hook size and yarn weight can be substituted in this pattern, so there’s real flexibility in how big or small your finished tulip turns out. Using the recommended fingering or super fine weight yarn with a correspondingly sized hook, the finished flower measures about 7.08 inches, or 18cm, from the base of the stem to the top of the bud.
Because the size scales directly with your yarn and hook choice, this pattern is easy to adjust. A finer thread and smaller hook will give you a more delicate, miniature tulip suited to a small bud vase arrangement, while a heavier yarn and larger hook produce a bigger, more substantial stem better suited to a standalone statement piece.
How the Crochet Tulip Is Made
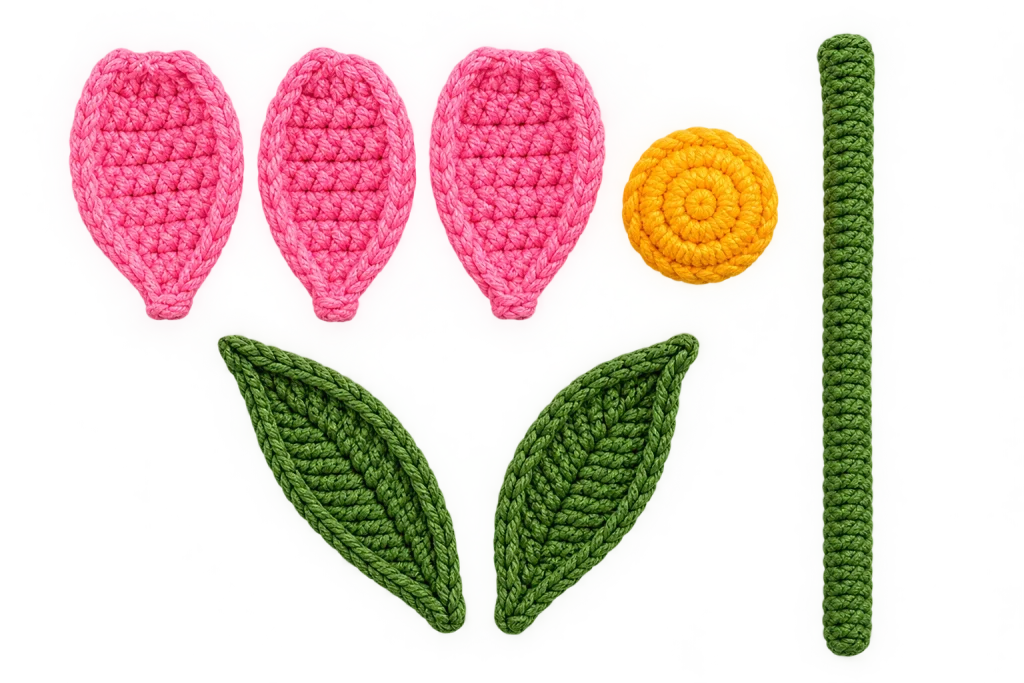
A crochet tulip is built from several separate pieces that come together at the end rather than being worked in one continuous piece. You’ll make three individual petals, a rounded flower center that the petals get sewn around, a long tubular stem with wire inserted for support, and two leaves in different lengths, one short and one long.
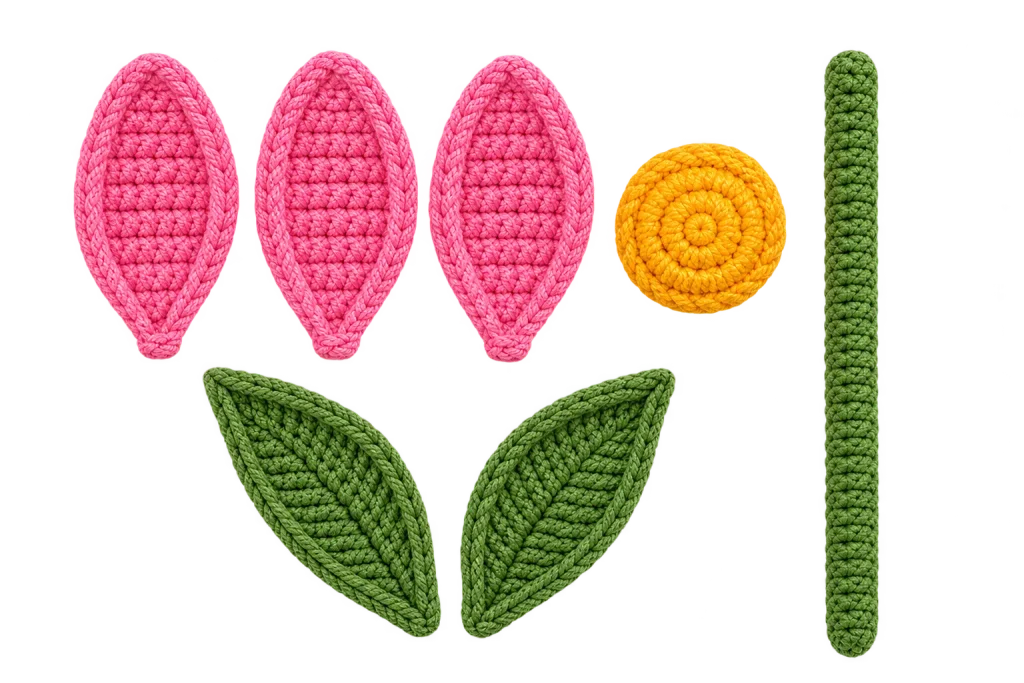
Most of this pattern is worked in continuous rounds rather than rows, meaning you crochet in a spiral rather than joining and turning at the end of each round. A stitch marker is genuinely useful here to track where each round begins, since there’s no join stitch to mark it visually the way there would be in row-based crochet. Stitches used throughout include single crochet, half double crochet, double crochet, and treble crochet, along with increases and decreases to shape each piece, and back loop or front loop only stitches where a ridge or defined edge is needed.
How to Crochet the Tulip Flower Head
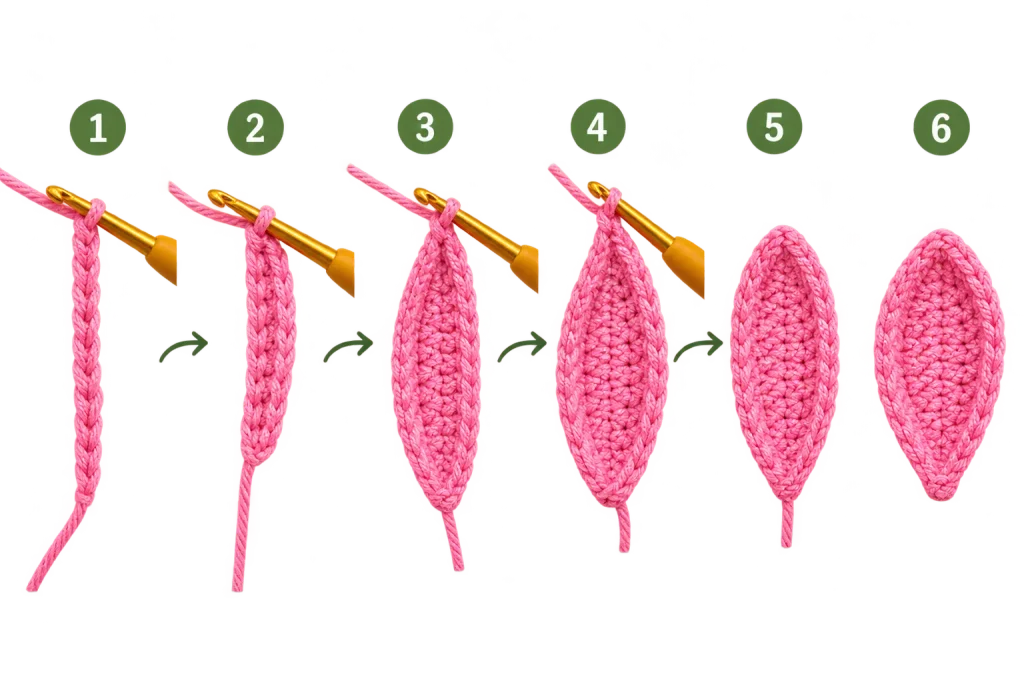
Each of the three petals starts as a foundation chain, then builds outward in rounds along both sides of that chain to form a smooth, elongated oval shape rather than a pointed or ruffled one. The stitch heights increase gradually from single crochet near the tips toward taller stitches through the middle of the petal, which is what creates the gently curved, rounded silhouette tulip petals are known for, instead of a flat, uniform shape.
A final round worked around the entire petal edge gives it a clean, defined border and adds just enough structure to help the petal hold its curve once it’s sewn onto the flower.
You’ll repeat this three times, since a classic tulip bud is built from three overlapping petals rather than the five or six you’d see on a flatter, fully open flower.
How to Shape and Close the Tulip
While the petals are worked flat, the flower’s center is worked in continuous rounds from a small closed starting circle, gradually increasing outward to its widest point, worked even for a few rounds, then decreasing back down to close into a rounded, teardrop-like shape. This piece is what the petals eventually wrap around, and it’s stuffed with fiberfill as you go, which is much easier than trying to stuff it afterward through a small closing gap.
This rounded center is really what gives the finished tulip its dimension. Without it, the petals would sit flat against each other. With a firmly stuffed center underneath, they curve outward the way real tulip petals do around the base of the bloom.
How to Crochet the Tulip Stem
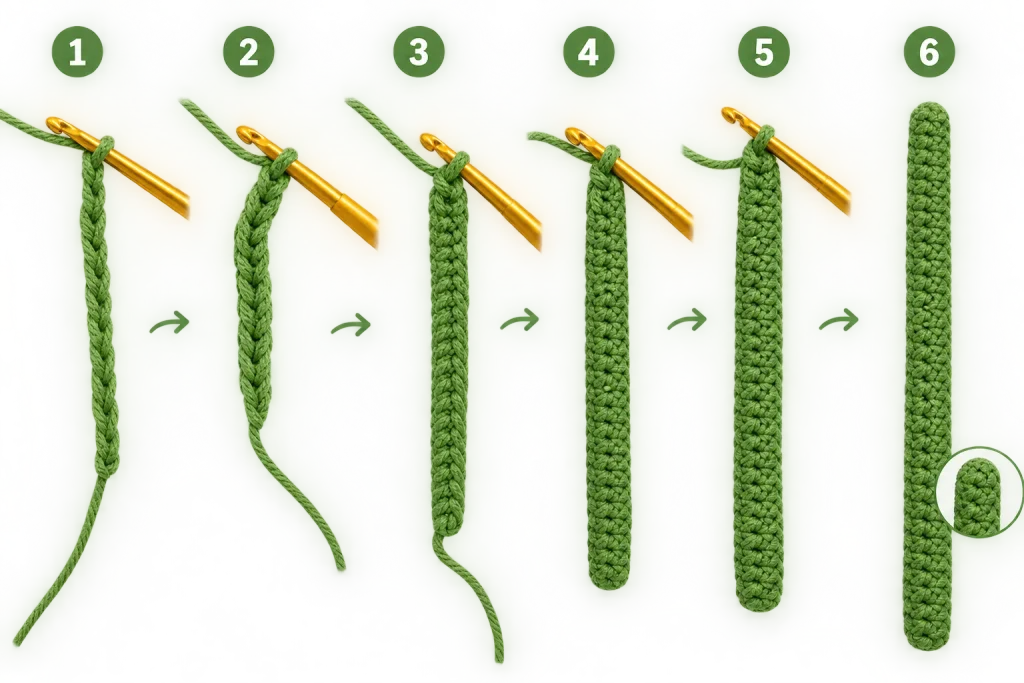
The stem is worked as a simple narrow tube in green, starting from a small closed circle and continuing in rounds of single crochet for its full length. Working an early round through the back loop only, rather than through both loops, creates a subtle ridge near the top of the tube, marking a clean transition point.
Because the stem is worked as a hollow tube rather than a solid piece, it needs both stuffing and a length of wire down its center to hold it upright once finished. Without the wire, a crocheted tube this narrow would flop rather than stand on its own.
How to Attach the Stem to the Flower
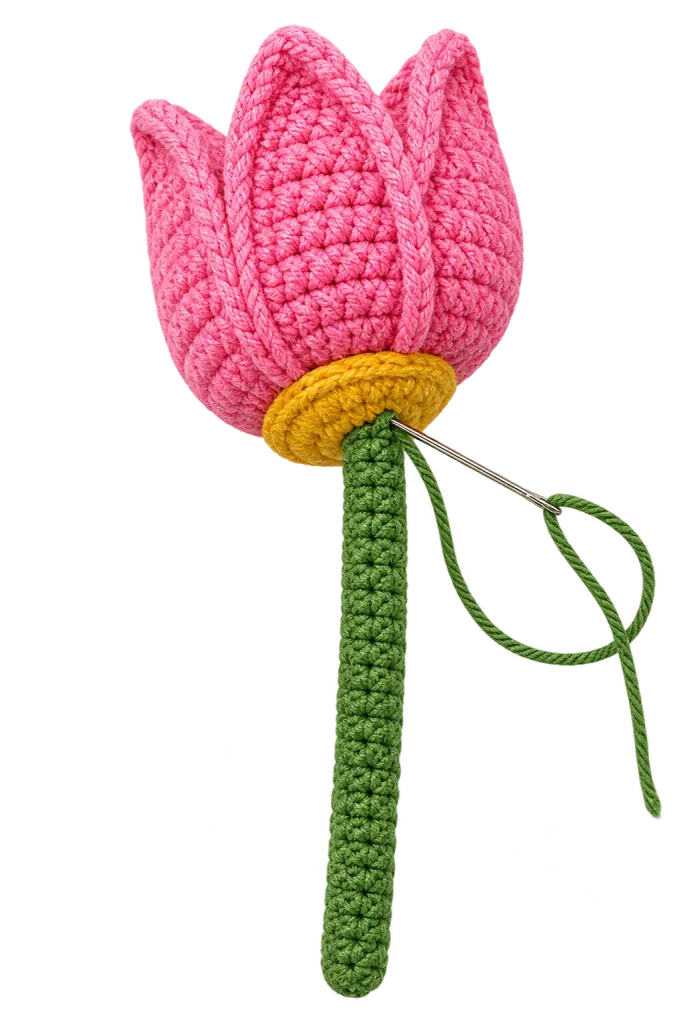
Once the flower center and the stem are both finished, the stem is sewn directly to the base of the flower center using a sewing needle. This is worked around the point where the two pieces meet, and it’s worth taking your time here, since this seam is what the whole flower head pivots on. A length of wire is then inserted down through the stem, and the bottom opening is sewn closed around it to keep the wire from sliding back out.
How to Finish and Shape Your Crochet Tulip
With the stem attached, the three petals are sewn around the flower center one at a time, overlapping slightly as you go so the finished bud closes into that classic rounded tulip shape instead of gaping open. The order you attach them in matters here. Each petal should overlap the previous one in the same direction, which gives the bud its gently twisted, natural-looking closure rather than a flat, symmetrical one.
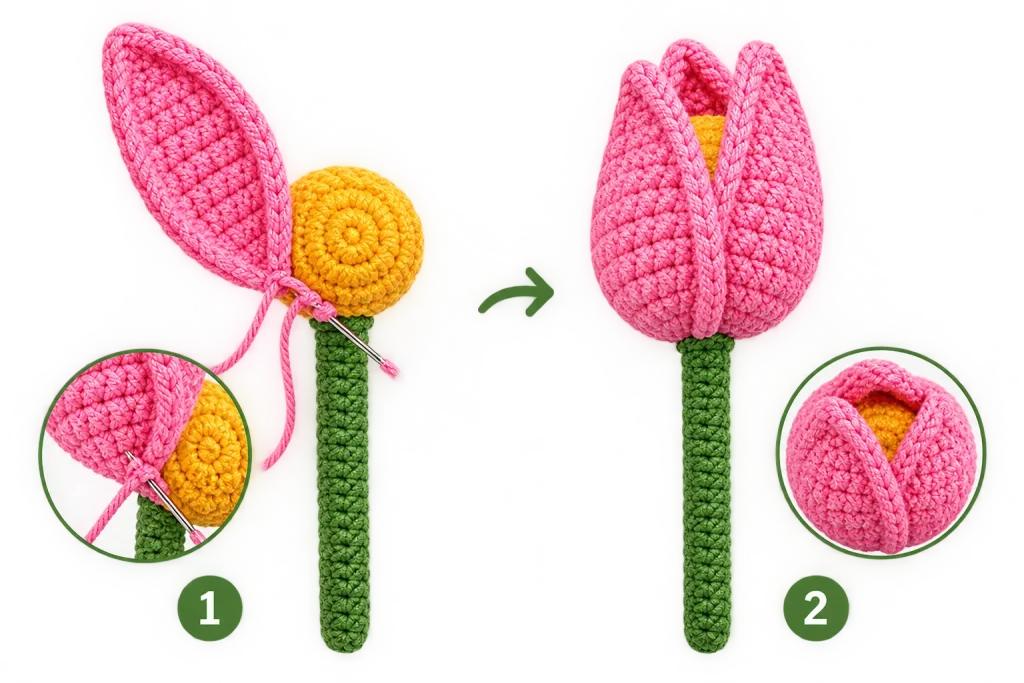
Once all three petals are in place, you can gently reshape them by hand, easing them into a slightly open or fully closed bud depending on which look you prefer for the finished piece.
How to Customize Your Crochet Tulip
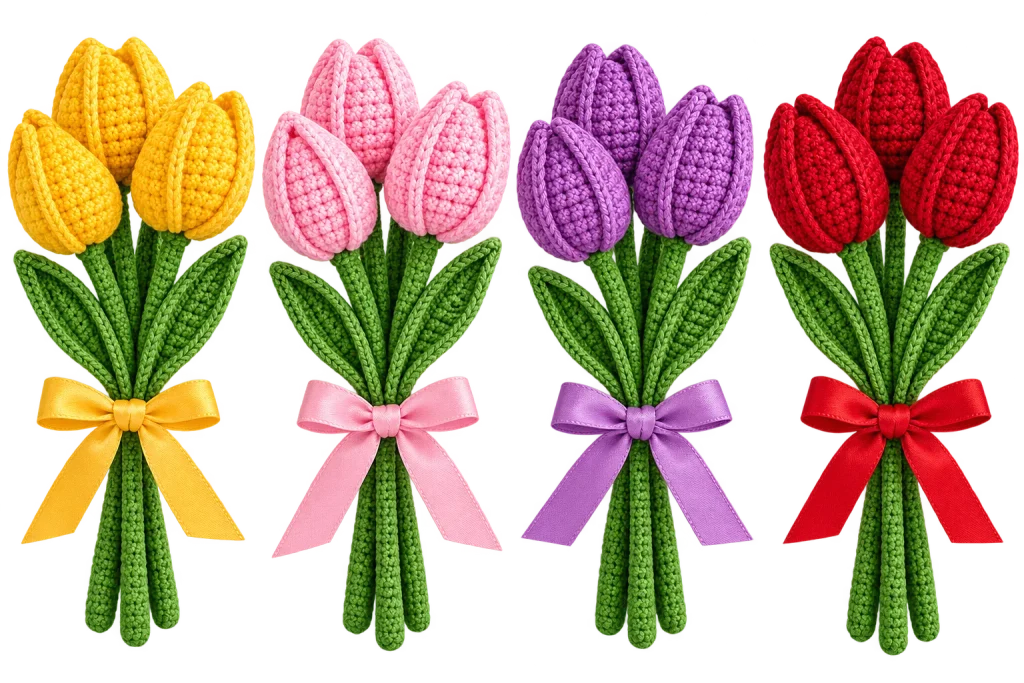
The pattern is written in pink, but tulips are naturally one of the most colorful flowers to recreate, and this construction adapts easily to other shades.
Sunny yellow gives the tulip a cheerful, classic spring look, especially paired against the same green stem and leaves.
Soft blush or pale pink stays close to the original but leans slightly more muted and romantic, well suited to spring wedding or nursery decor themes.
Deep purple or magenta shifts the tulip into a richer, more dramatic register, closer to how some of the deeper tulip varieties look in real gardens.
Bright red is the most classic tulip color of all, and a strong choice if you want your finished bouquet to read unmistakably as tulips from across a room rather than as a more generic spring flower.
Because the flower head and stem are worked as separate colored pieces, you can also experiment with two shades of the same color family for a more painterly, variegated look, similar to how some real tulip varieties shade from a pale base to a deeper petal tip.
How to Make a Crochet Tulip Bouquet
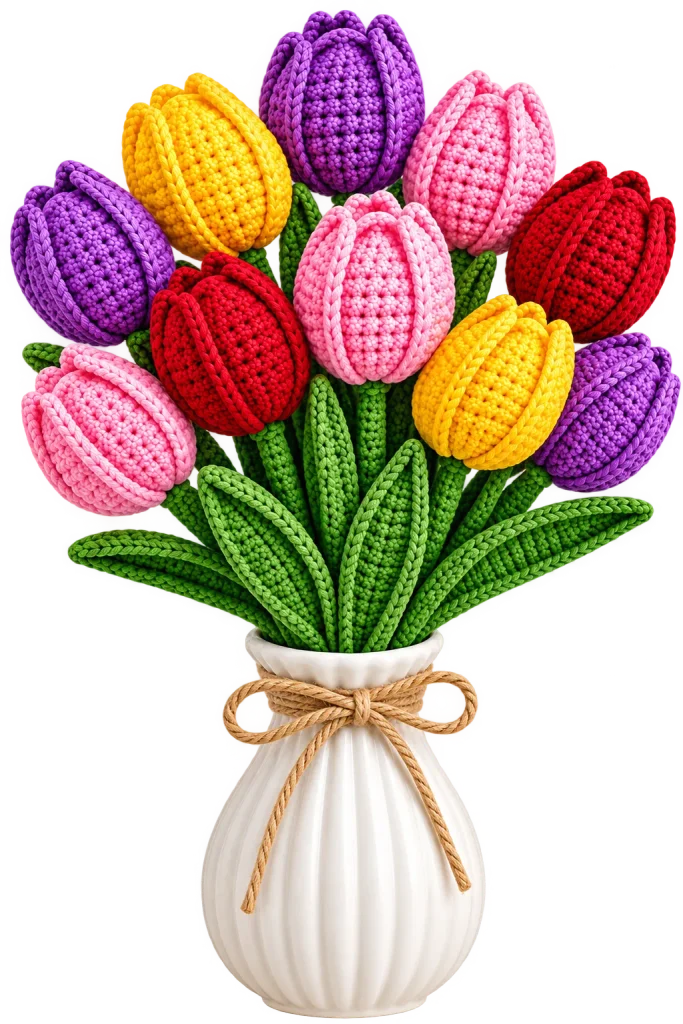
A single tulip is lovely on its own, but this is a flower that especially rewards being made in multiples. Because each stem is wired and freestanding, a handful of tulips in mixed colors can be gathered directly into a vase the way you’d arrange real cut flowers, with no floral foam or additional support needed.
For a traditional look, group tulips in a single color for a clean, uniform bouquet. For something with more visual movement, mix two or three colors. Yellow and red together read as a classic spring garden mix, while pink and purple lean softer and more contemporary.
Adding leaves to a few stems in the bouquet, rather than every single one, tends to look more natural than leafing every stem, since it mimics the way real cut tulips are usually trimmed and arranged before they’re sold.
Tips for Making Neat Crochet Tulips
A few small habits go a long way toward a clean, professional-looking finished tulip.
Stuff the flower center and stem firmly, but not to the point of stretching your stitches. Underfilled pieces will look soft and collapse rather than holding a rounded shape, while overfilled pieces can distort the stitch pattern and make the surface look bumpy instead of smooth.
Keep your stitch marker moving with you every round. Since most of this pattern is worked in a continuous spiral rather than joined rounds, it’s easy to lose track of where a round starts and end up a stitch or two off without noticing until several rounds later.
Take your time with the petal attachment order. Overlapping all three petals in the same rotational direction is what gives the finished bud its realistic closed shape, and it’s much easier to get this right the first time than to unpick and resew a petal that was attached backward.
Sew with a finer, separate thread rather than your working yarn where you can. It creates a neater, less bulky seam, especially around the smaller petal attachment points.
Add your fiberfill as you crochet each piece rather than waiting until it’s finished. Stuffing through a nearly closed opening is much harder than adding it gradually while there’s still an opening to work through.
Common Crochet Tulip Mistakes and How to Fix Them
A bud that gapes open instead of closing neatly. This usually comes down to not overlapping the petals enough when sewing them on. Go back and adjust the stitching so each petal tucks further under the one before it.
A stem that bends or flops instead of standing upright. Check that your wire runs the full length of the stem and that the base opening is sewn securely closed around it. A wire that’s only partway in, or one that can slip back out, won’t provide reliable support.
A lumpy or uneven flower center. This is typically a stuffing issue rather than a stitching one. Add fiberfill in small amounts as you work each round rather than stuffing all at once at the end, which distributes it more evenly.
Petals that look flat rather than curved. Make sure the flower center underneath is stuffed firmly before you attach the petals. A softly stuffed or collapsed center won’t give the petals anything to curve around.
Losing track of your round count. Since this pattern works mostly in continuous spirals, a stitch marker moved up at the start of every round is the easiest fix, along with counting your stitches at the end of each round against the pattern.
Crochet Tulip Pattern
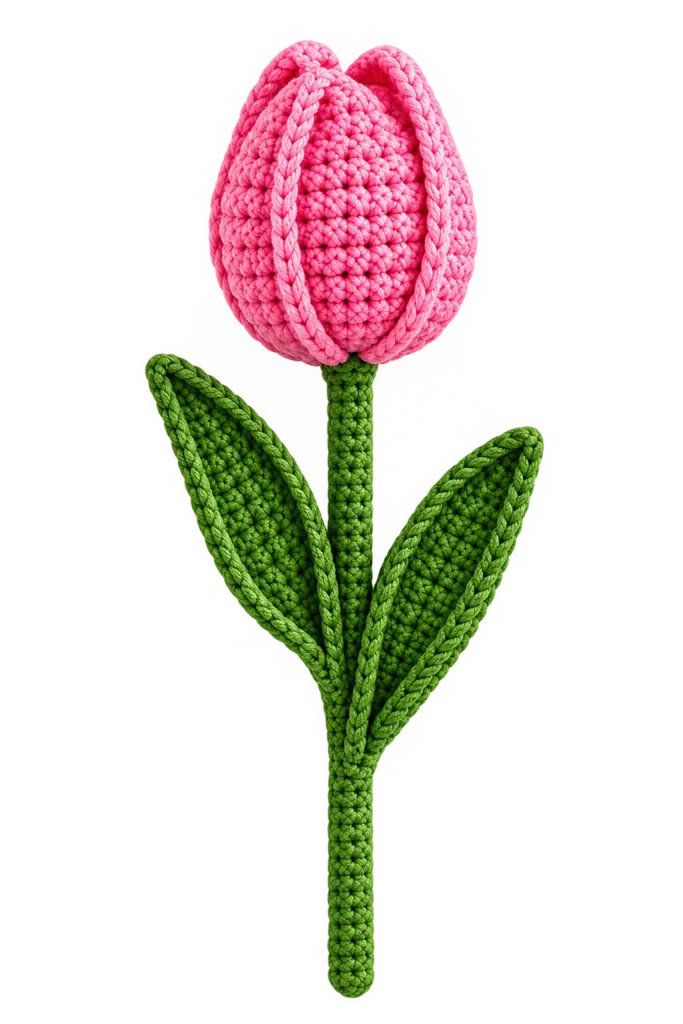
Materials: Fingering or super fine weight yarn in pink and green, a hook sized to suit your yarn, fiberfill, a sewing needle, and wire. Approximately 70 yards of yarn total.
Finished size: Approximately 7.08 inches (18cm) tall, using fingering or super fine weight yarn with a correspondingly sized hook. Any hook and yarn size can be substituted to change the finished scale.
Petals (make 3): Worked flat from a chain foundation, building outward in rounds with stitch heights increasing toward the center of the petal for a curved, rounded shape, finished with a border round for a clean edge.
Flower center: Worked in continuous rounds from a closed starting circle, increasing to its widest point, worked even for several rounds, then decreasing back down to close, stuffed with fiberfill as you go.
Stem: Worked as a narrow tube in continuous rounds of single crochet, starting with a back-loop-only round to create a defined edge, continued for the desired stem length, stuffed and reinforced with wire.
Leaves (make one short, one long): Each leaf starts from a chain foundation and is worked around both sides in rounds, with stitch heights increasing toward the leaf’s center for a tapered, pointed shape; then a second round adds a raised centerline detail down the middle of the leaf.
Assembly: Sew the stem to the base of the flower center. Insert wire into the stem and sew the base closed around it. Sew the three petals around the flower center, overlapping each one in the same direction to close the bud. Sew the leaves onto the stem in your preferred position.
How to Use Crochet Tulips for Gifts and Decor
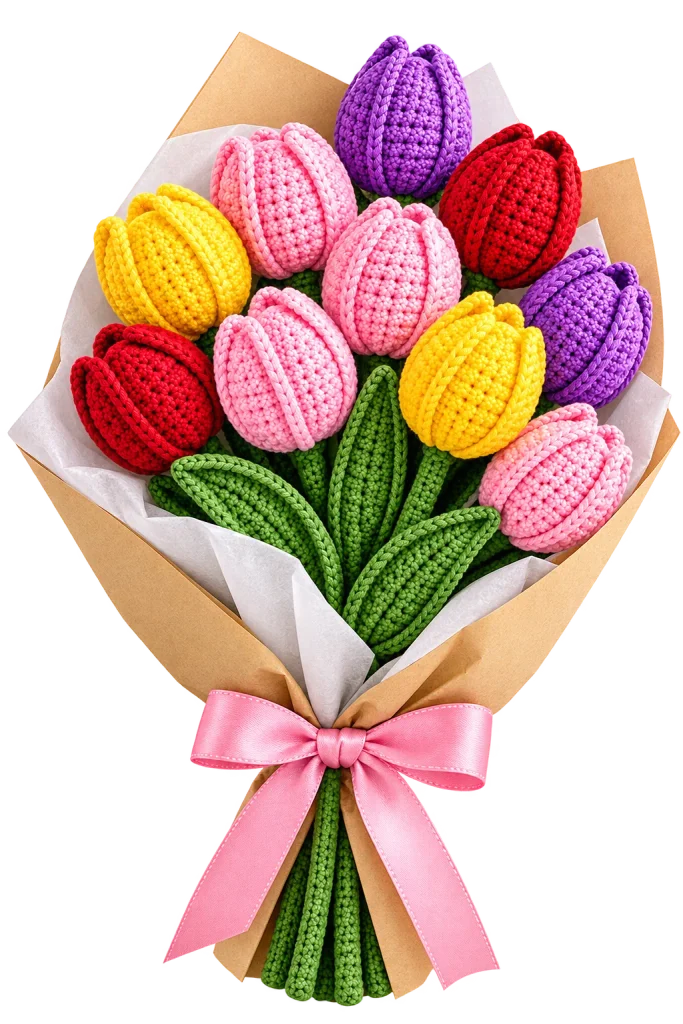
A finished tulip, or a small bundle of two or three, makes an easy handmade gift that doesn’t need wrapping paper to feel thoughtful. Tied with a bit of ribbon or twine, they hold up well entirely on their own. Because the stems are wired, they’re also genuinely useful as a lasting substitute for cut flowers on a desk, a windowsill, or a dining table centerpiece, somewhere a fresh bouquet would normally wilt within a week.
For a seasonal touch, a cluster of yellow and red tulips works well as an Easter or spring table accent, while a single stem in a bud vase makes a simple, low-effort addition to a nightstand or bathroom shelf. A finished tulip also holds up well as a brooch or hair accessory base if you skip the wire and mount the flower head directly onto a clip or pin back instead.
More Crochet Flower Patterns to Try
If you enjoyed working through the separate piece construction of this tulip, that same general approach- building a flower head, a stem, and leaves as individual pieces before assembling them- carries over well to other crochet flowers. Each flower type tends to have its own petal shape and stitch pattern, but the core skills of stuffing, shaping, and assembling translate from one project to the next.
FAQ
What yarn weight works best for this tulip pattern?
Fingering or super fine weight yarn gives the finished flower its defined stitch texture and its roughly 7.08 inch (18cm) finished size. Heavier yarn will produce a larger, chunkier tulip, which can still look great, just at a different scale.
Do I need to use wire in the stem?
Yes, for the stem to stand upright the way a real cut tulip does. Without wire, a narrow crocheted tube this length won’t hold its own shape and will bend or flop instead.
Can I make a crochet tulip without leaves?
Yes. The leaves are sewn on separately, so you can leave them off entirely for a simpler stem, or add just one instead of two if you want a more minimal look.
How much yarn do I need for one tulip?
The pattern calls for approximately 70 yards total between the pink and green yarn, which covers the flower head, stem, and both leaves.
Can I substitute a different hook and yarn size?
Yes. This pattern works with any yarn and hook size, though your finished measurements will scale up or down accordingly rather than matching the 7.08 inch (18cm) size given for the recommended fingering weight yarn.
How many petals does a crochet tulip need?
Three, which matches how a real tulip bud is structured and gives the closed, overlapping bud shape rather than a flatter, more open flower.
[…] How to Crochet a Tulip: Easy Step-by-Step Flower Pattern […]
[…] How to Crochet a Tulip: Easy Step-by-Step Flower Pattern […]
[…] Along the way, you’ll find a full materials list, an abbreviations guide, step-by-step instructions matched to your photos, tips for neat wire work, fixes for common problems, color ideas, and styling suggestions. If you’re new to reading patterns, our guide to crochet symbols and abbreviations is a helpful companion to keep open while you work. And once you’ve made your first calla lily, you can build a mixed bouquet with other flowers from CrochetFloria, including crochet lavender and a crochet tulip. […]